
Homemade card sets are such a wonderful gift idea. Today I’m bringing you some tips and ideas on how to design and create a set of feminine cards.
This is also part of the Level 1 Final Project in the Altenew Educator Certification Program. My assignment is to create two sets of cards, one masculine, the other feminine, using at least three techniques learned from the Level 1 courses. The sets must be cohesive, have a card holder and include one recycled item. This post is dedicated to the Card Set for Her. Card Set for Him is coming soon.
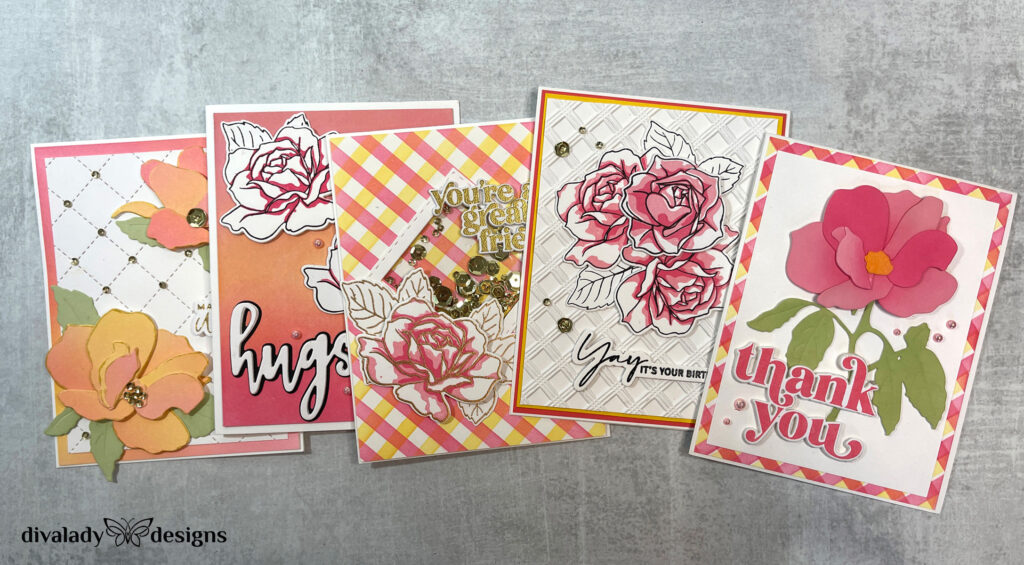
Card Set for Her
Planning a Card Set
There are three things I needed to choose before I began designing: techniques, colors and products. The color palette is arguably the most important choice, and I went with my favorite – pink and yellow. I love a warmer pink tone, and Coral Berry fit the bill. I chose Cotton Candy to complement the warm tones of the Coral Berry, and Warm Sunshine for my yellow. This would give a bright, yet warm feel to the cards, and the warmer pink would be able to handle the inevitable orange that would result from yellow and pink blending together.
I decided to focus on these three classes: Celebration: Stencil Techniques, Irresistible Inking Techniques and All About Layering. For me, layering is more than stamp layering – it’s any kind of layering, from paper to die cuts, so it was a perfect compliment to the other techniques. Once I chose my techniques, the products fell into place.
I chose to use the Altenew Craft Your Life Project Kit: Garden Rose kit. This kit contains a layered stamp set, die cuts, stencil and embossing folder. I loved the idea of creating a trellis from the stencil and this led me to choose other products with a trellis theme: Altenew Basic Plaid 3D Embossing Folder and Concord & 9th Quilted Card Front Die. Finally, I chose Altenew Craft-A-Flower: Garden Rose layered die cuts just because I loved it! I figured I would choose sentiments from my sentiment box to suit the cards as I created them.
The Process
My approach to card making is pretty much four steps: Background, focal point, sentiment and embellishments. I usually create a background and take it from there. My backgrounds are almost always technique based, and it’s often the technique that is the inspiration.
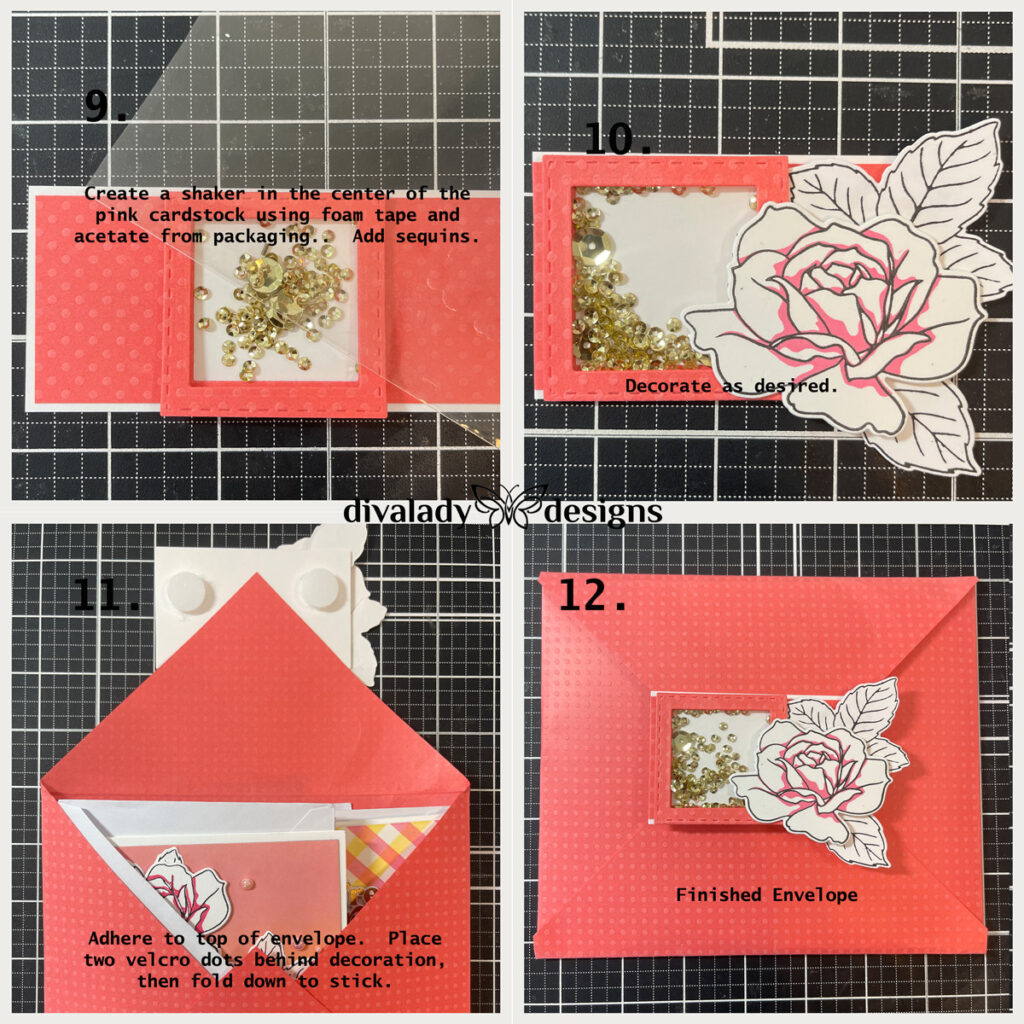
For this set, I began by creating a background, in this case the trellis stencil. I knew I wanted to create a shaker card and use leftover acetate packaging as my recycled item. This started the creative process and from this one background, ideas began to flow and led to the creation of the other cards.
So let’s start with the shaker card and I’ll explain how one idea led to another.
Friend Shaker Card
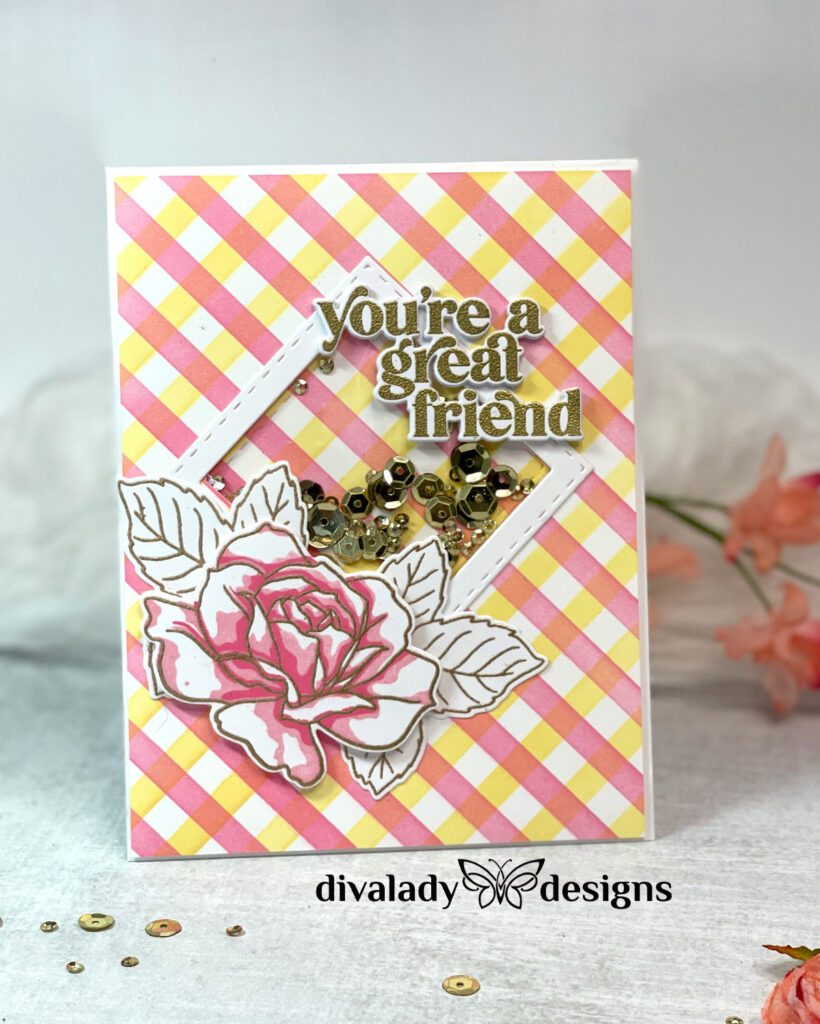
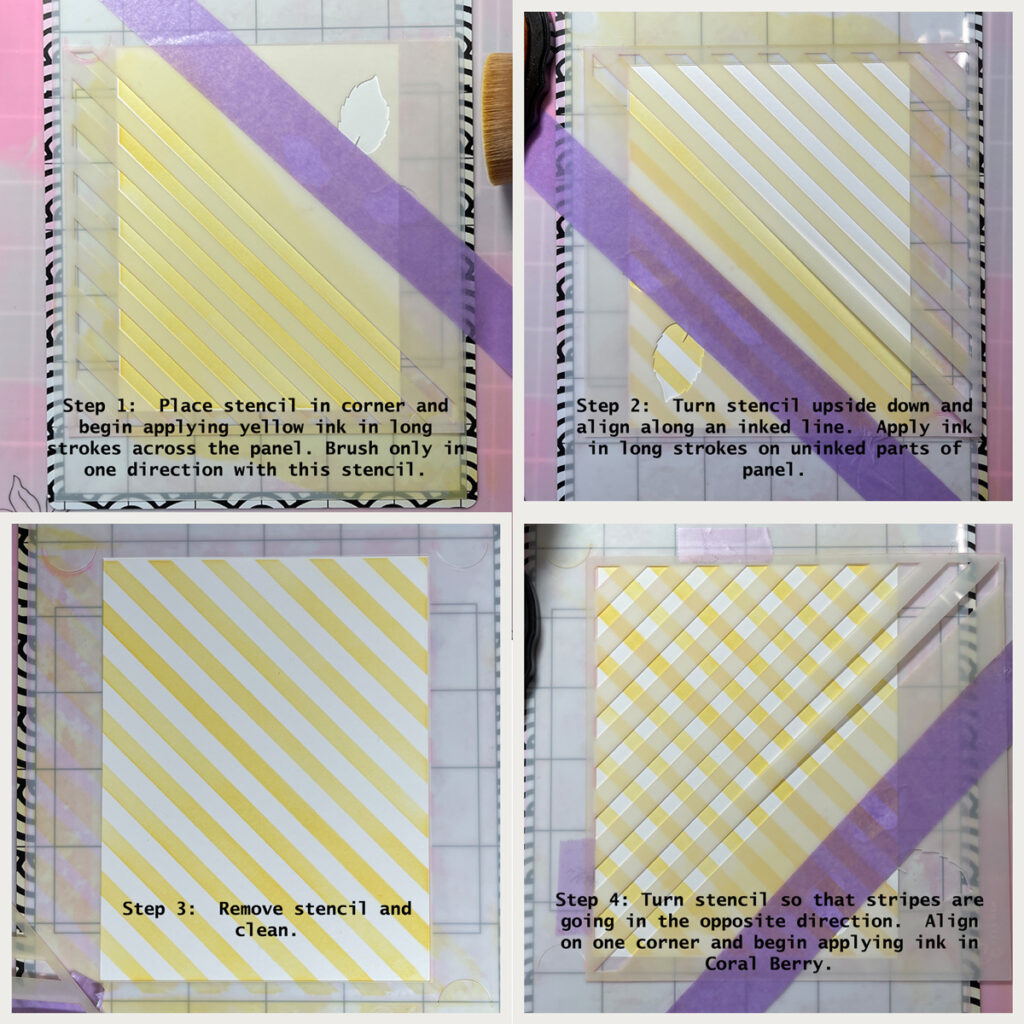
I knew I wanted to use the stencil from the Altenew Craft Your Life Project Kit: Garden Rose kit as soon as I saw it. It has words, lines, and florals included, but the stripes are what grabbed my interest. It’s a half stencil, so you can use it to stencil half a card, or a whole card. I chose to use it to create a trellis pattern for a background panel, and it’s amazingly easy! I’ve detailed the directions with pictures below.
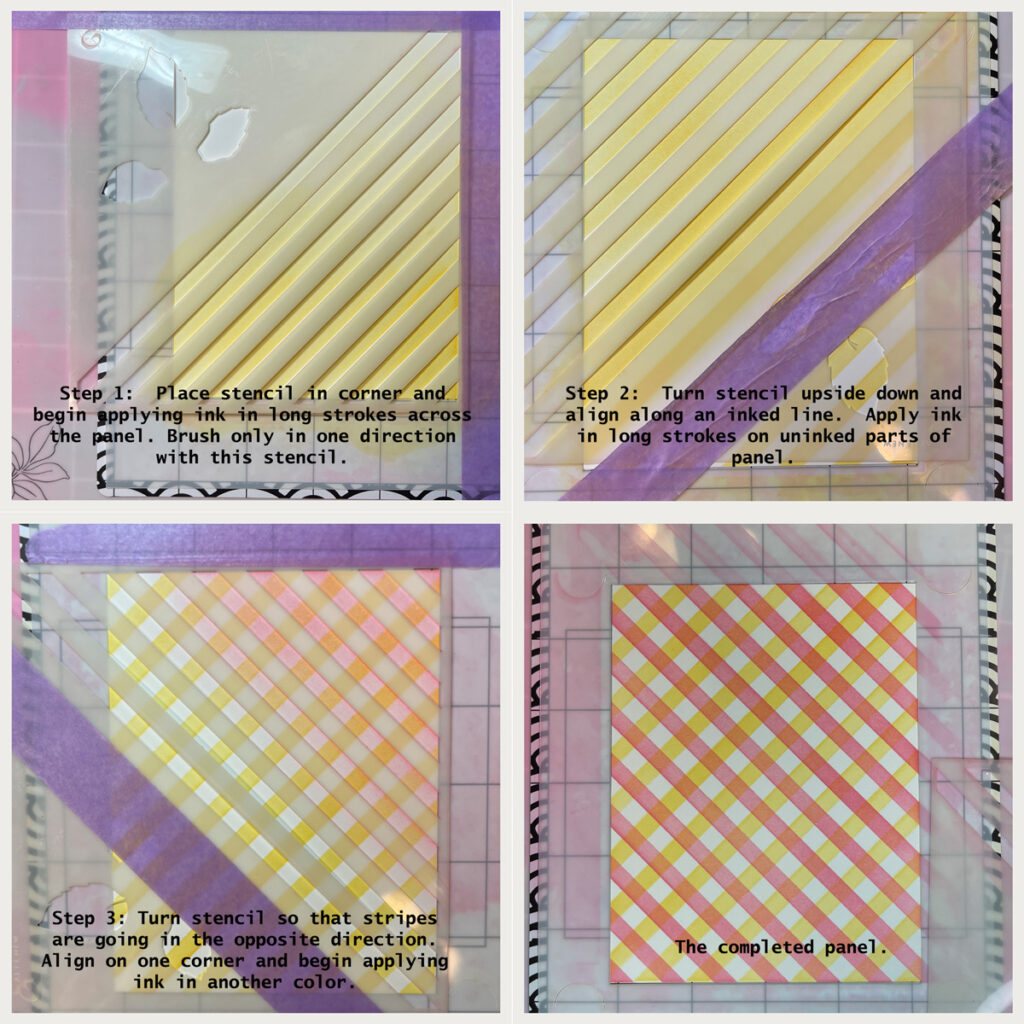
TIP: Brush only in one direction with this stencil. I have found that striped stencils move a lot while applying ink. The best way to prevent unwanted movement is to brush in one direction at a time.
TIP: Use a sticky mat to hold your cardstock and stencil in place while inking. I have several different mats and they all work beautifully. Best part, you can use a baby wipe afterward to wipe off ink and the sticky part remains!
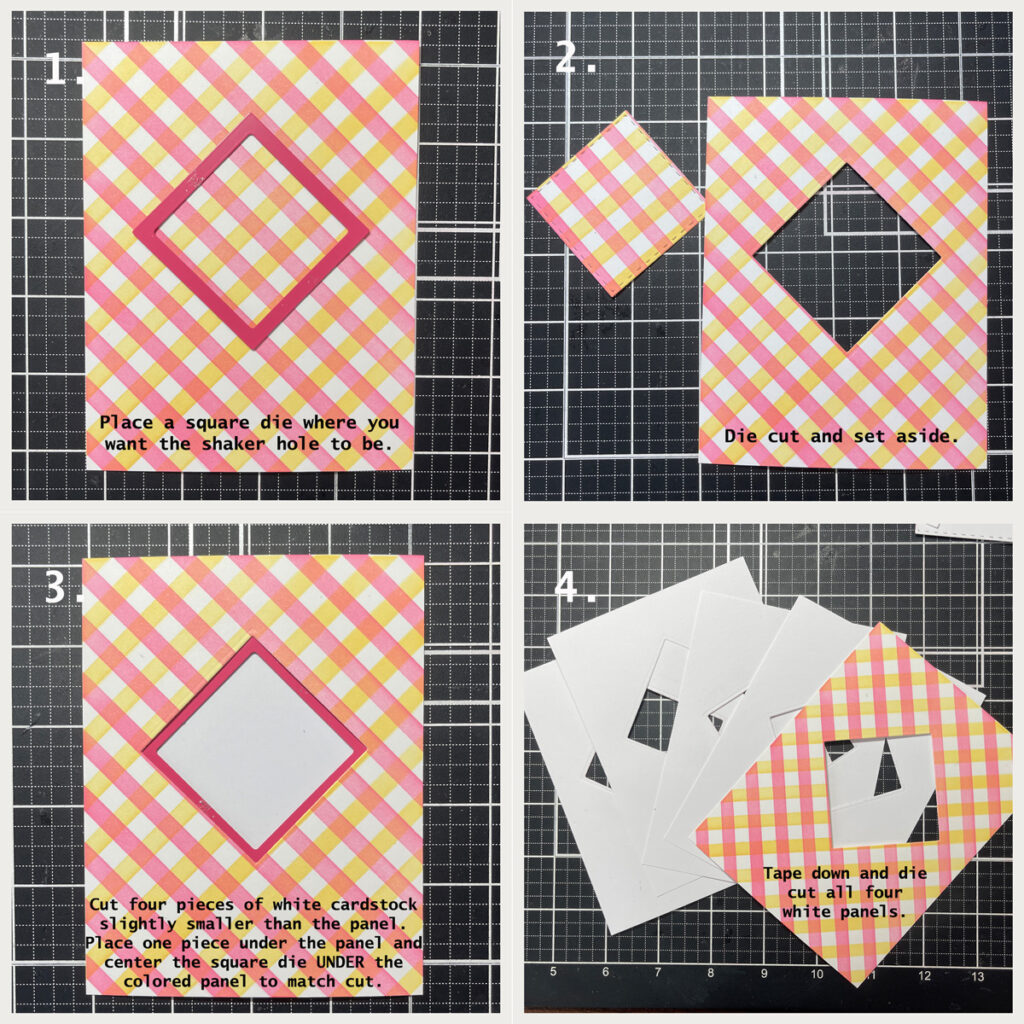
To create my shaker card, I used a slightly different technique which I learned from Jennifer McGuire. I wanted the back of the shaker area to be the same pattern as the rest of the background. In order to accomplish this, I used layers of white cardstock to create the walls of the shaker. Photos and instructions are below. If you would prefer a video tutorial, I created this one for the Shaker Card for Him. It’s the same process, just a different look.
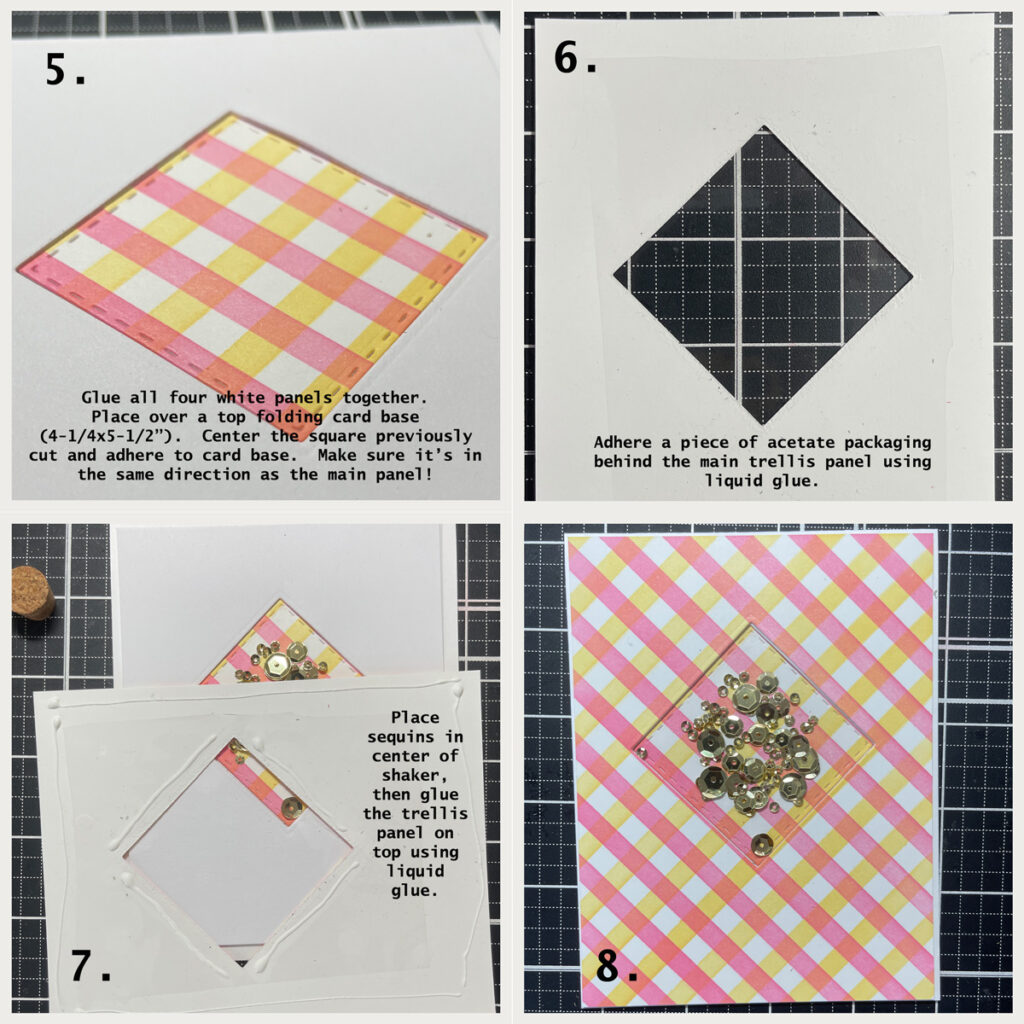
Hugs Card – Ink Blending & Layered Stamping
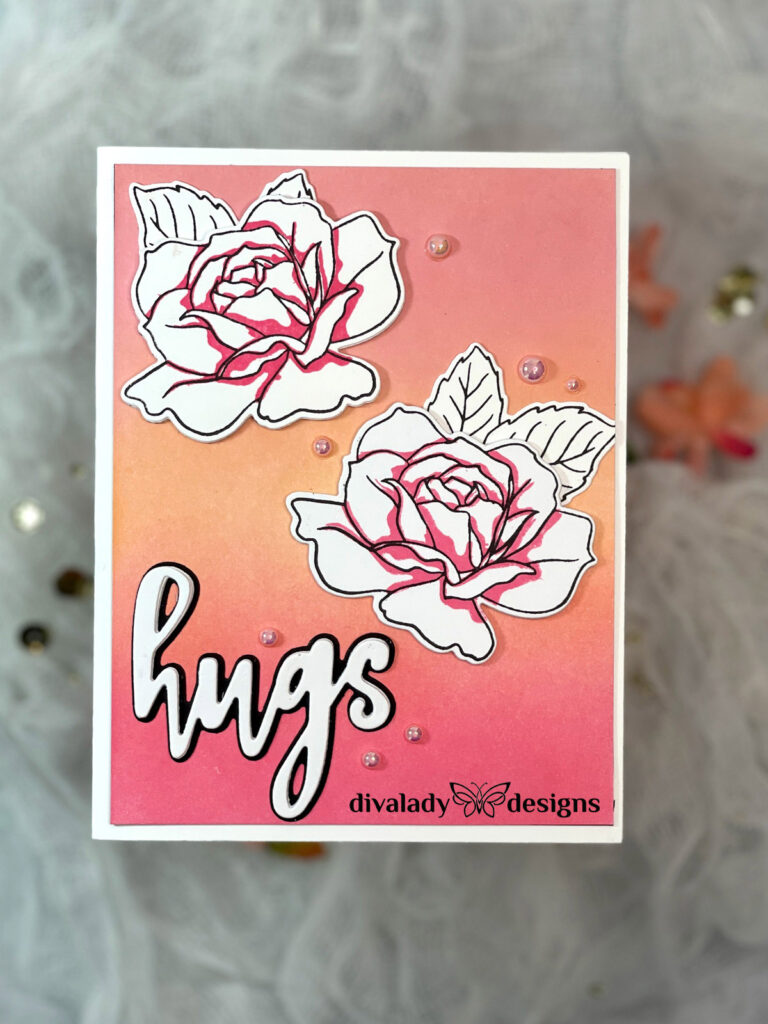
I was so happy with the shaker card! The colors were vibrant and happy, and I love the layered stamping of the rose. So, I decided to create some more layered roses and use them on a different background.
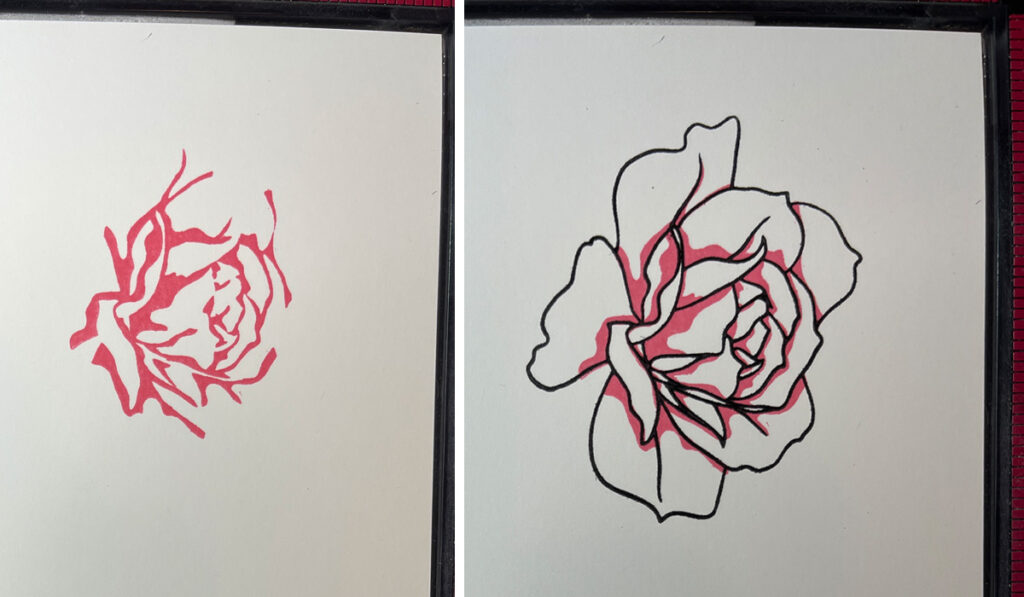
Layered stamping can be intimidating at first. But during my stamping journey, I’ve developed a fabulous tip for perfect results! Each one of Altenew’s Layered Stamp sets has a layering guide. It’s very helpful for figuring out how to layer one stamp over the other. Here’s the guide for Altenew Craft Your Life Project Kit: Garden Rose which you can download from the Altenew website.
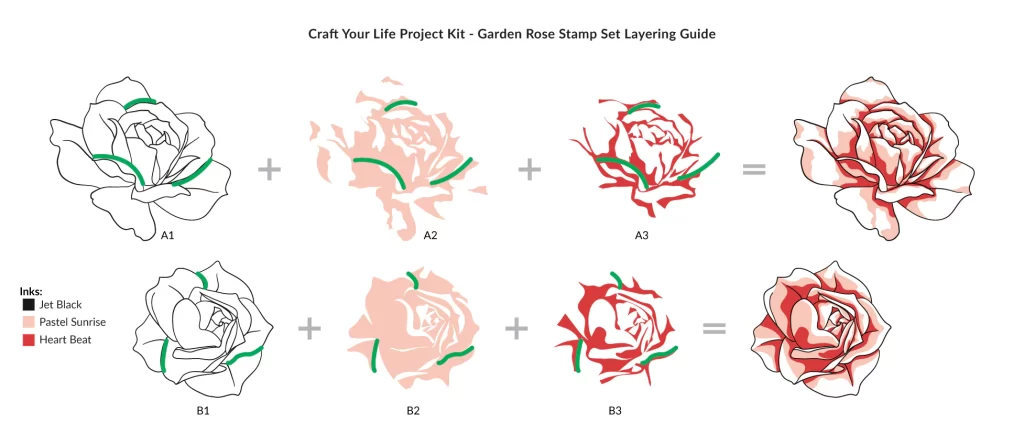
This guide shows how to start with the outline stamp (A1), and layer on top from there. BUT, I discovered that if you start with one of the other stamps first, it’s easier to line everything up. Below, I stamped A3, the third stamp first, then stamped A1 (the outline stamp) over that. It resulted in a perfect layer every time, and I stamped a lot of them!
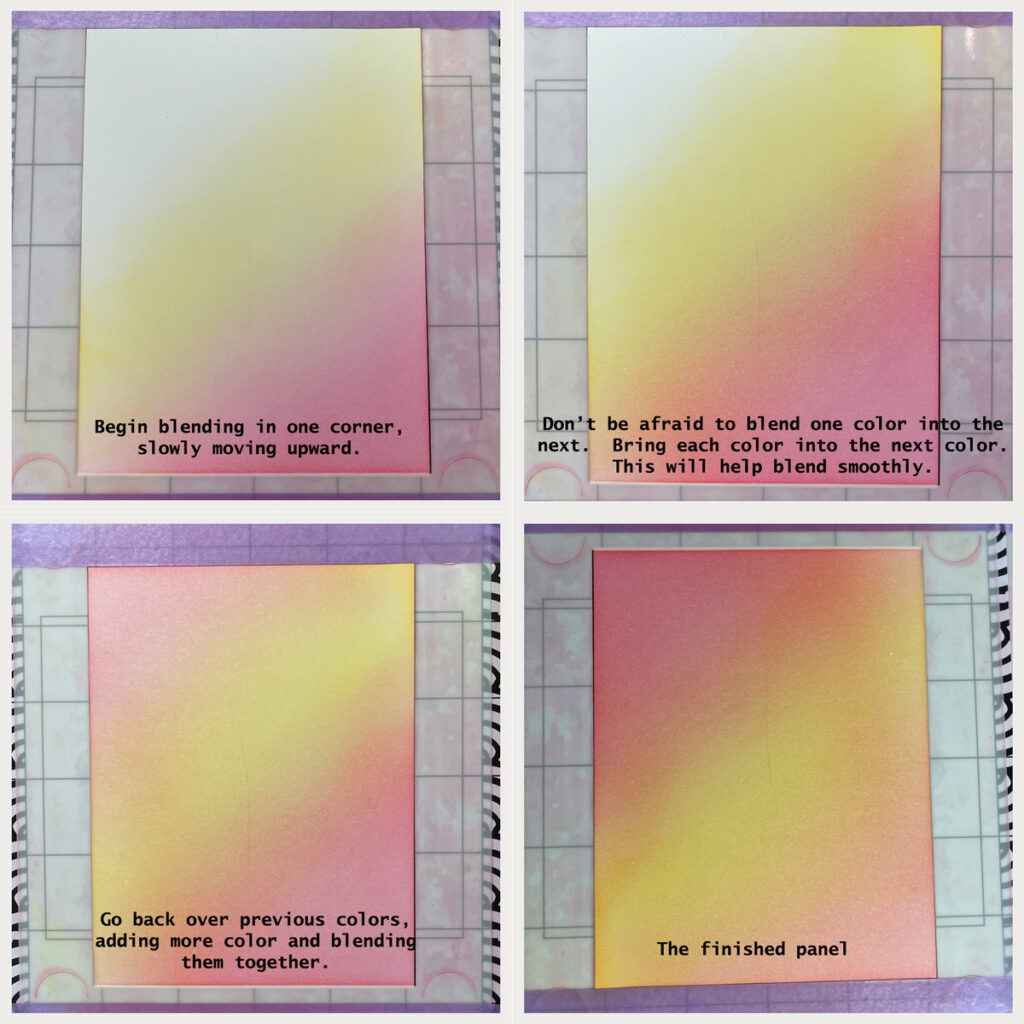
I love learning and I take every class I can afford. I also watch YouTube instructional videos ad nauseum. I had been experimenting with ink blending for a while before I started this program, and after absorbing every tip I could from the Altenew courses, I came up with the following process for ink-blended panels:
Your blending brush DOES make a difference! I use Pink & Main blending brushes. Altenew’s blending brushes are pretty much the same thing and if I hadn’t already purchased the ones from Pink & Main, I would have ordered those. The large brush end spreads the ink evenly and beautifully and the handle makes blending a breeze.
TIP: Always “stamp off” your ink before beginning to blend. It helps to prevent a blob of ink appearing on the cardstock.
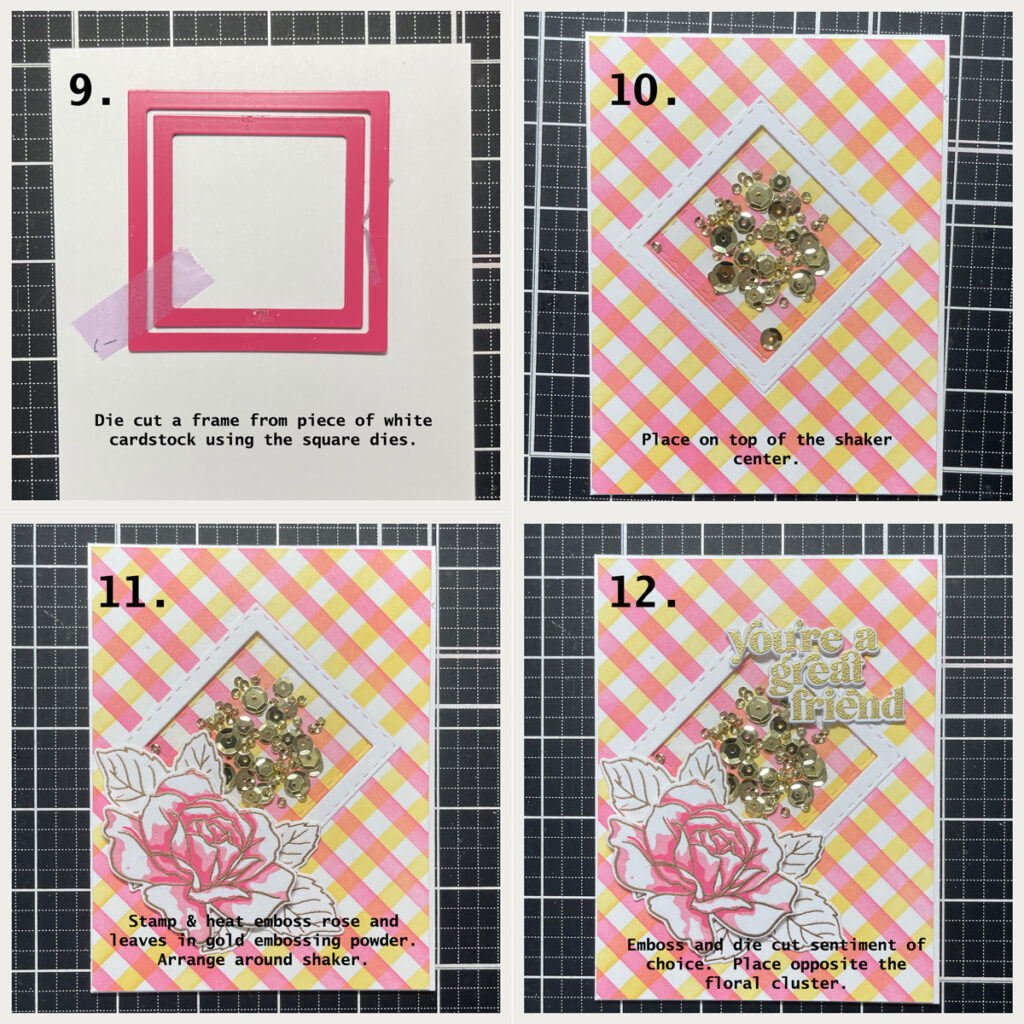
I stamped and created two of the large roses using Altenew Crisp Dye Ink – Permanent Black and Altenew Crisp Dye Ink – Coral Berry. I also stamped and die cut several of the leaves. For my sentiment, I used Altenew Hello and Hugs Die Set and added some pink pearls from Studio Katia.
For all of my floral images, I cut additional dies from a low grade white cardstock for layering. I love dimension, and I prefer the look of stacked layers to foam tape.

Thank You and Direct-to-Paper Inking
For my next card, I decided to have fun with the Altenew Craft-A-Flower: Garden Rose set. I’ve just started playing with layering dies and this set makes me happy.
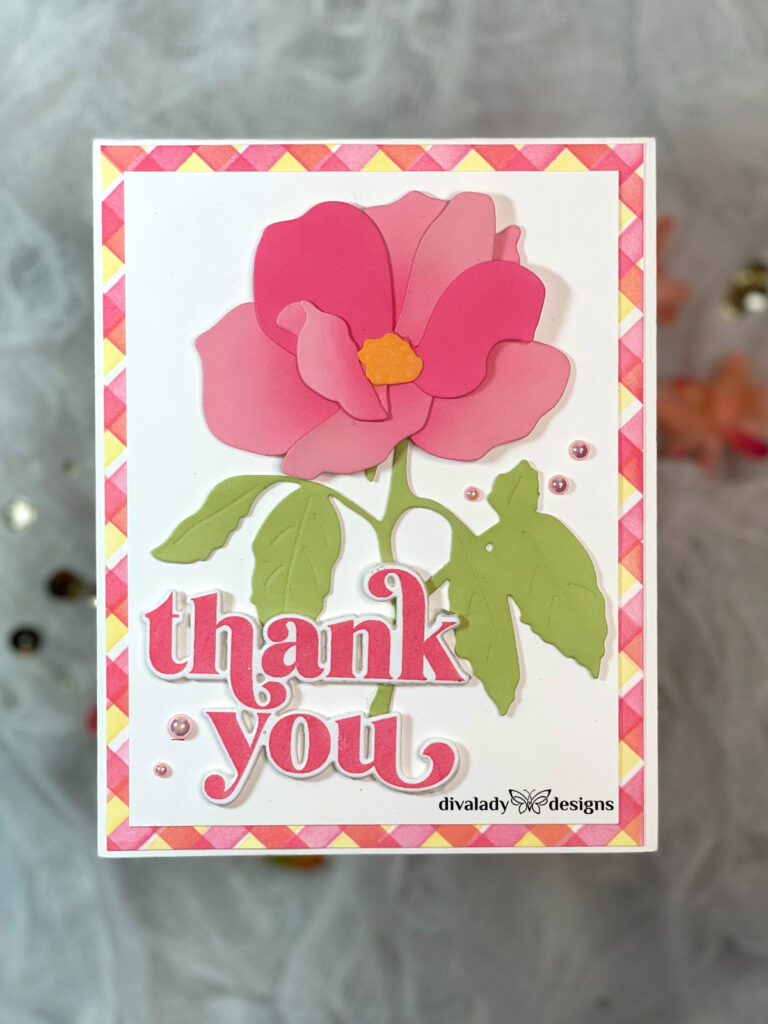
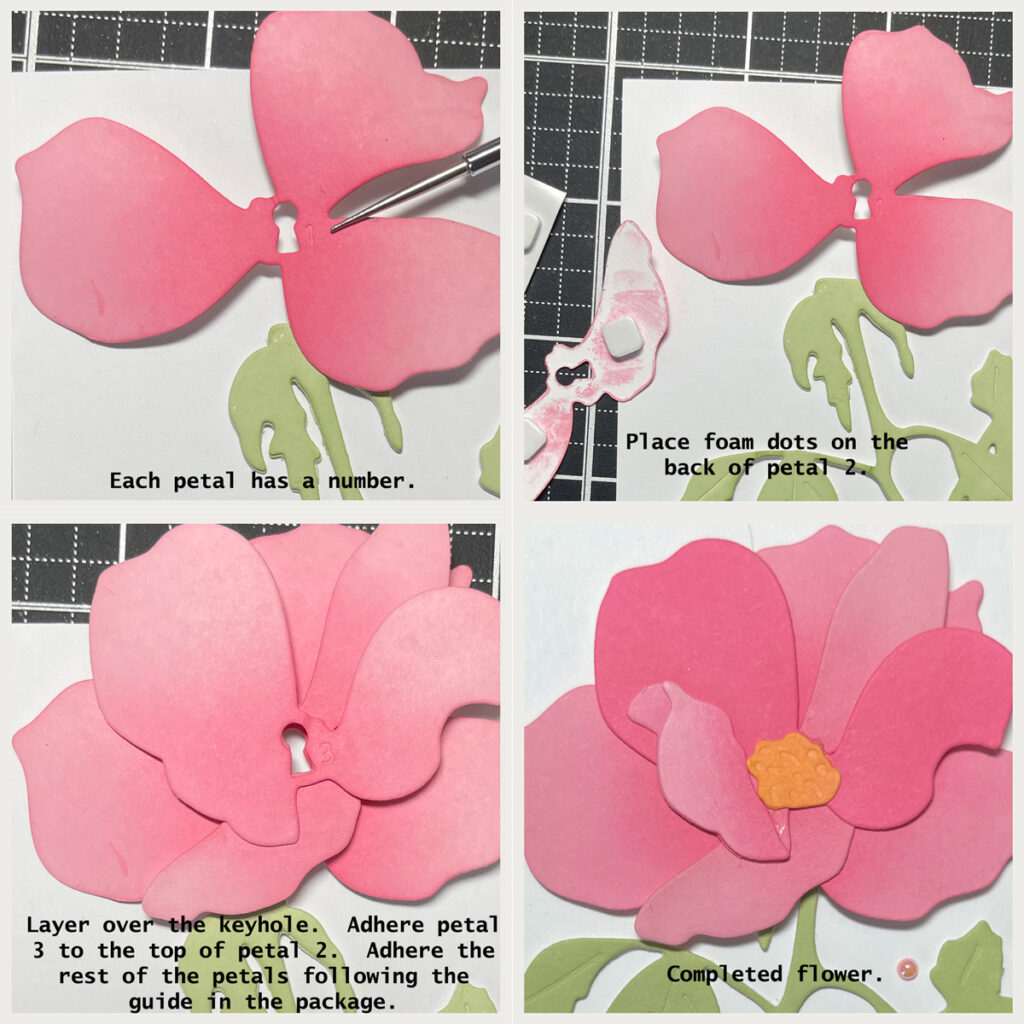
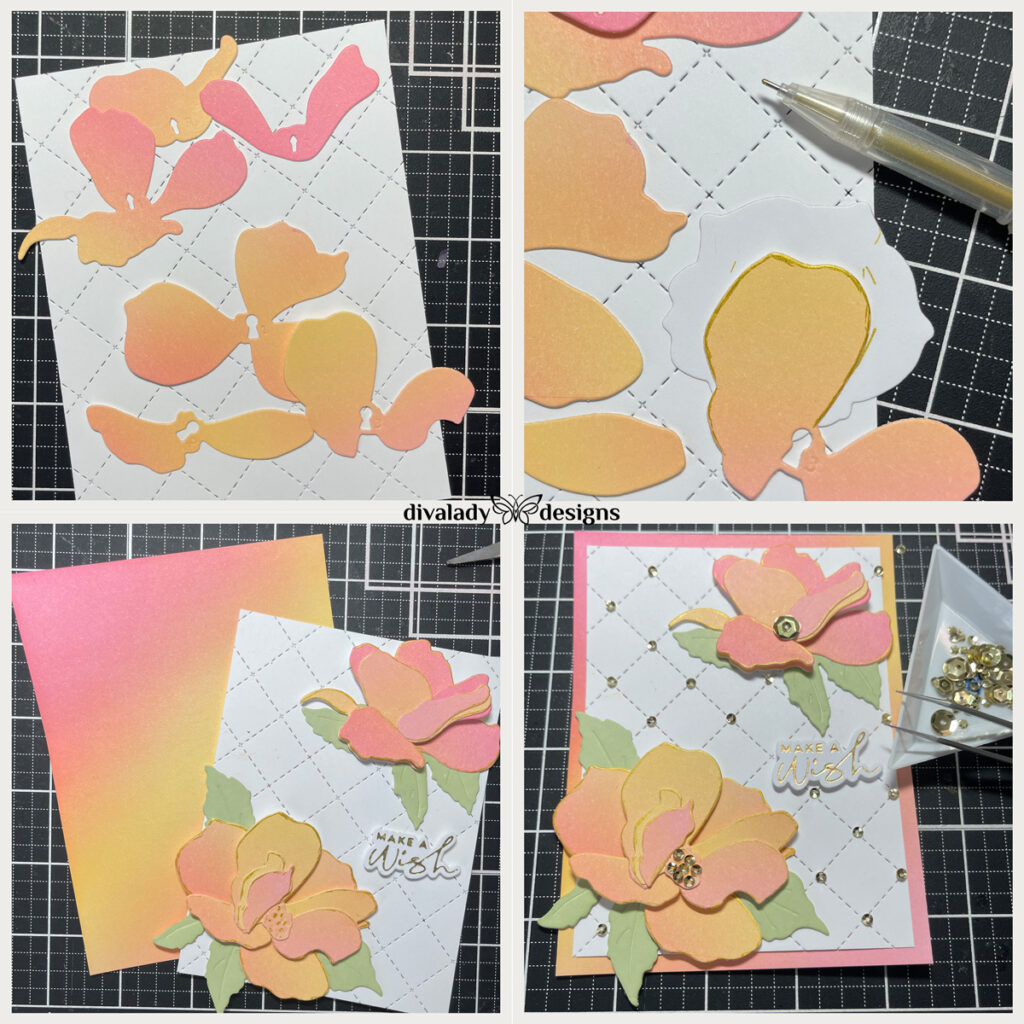
To create my flower, I die cut all the pieces out of white cardstock and then applied Cotton Candy Crisp Dy Ink using direct to paper inking. This is a technique wherein you apply the ink pad directly to the cardstock in swift motions, inking until completely covered. It gives a more solid, vibrant color to the cardstock. I used Frayed Leaf for the leaves.
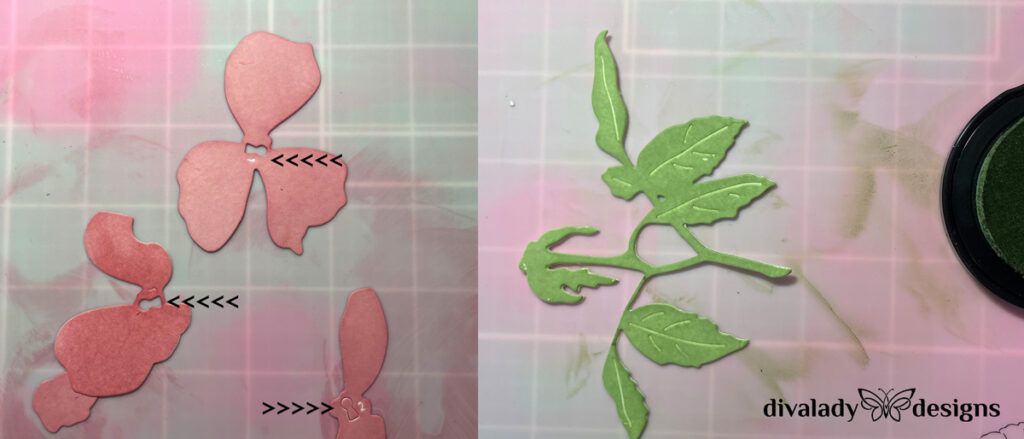
After I inked the petals, I used a small blending brush to apply some Coral Berry to the inner parts of the petals.
Also, notice the arrows on the pink petals? This is how Altenew helps us assemble the flowers. The petals are numbered, and I just had to layer them (1, 2, 3) on top of each other centering them on the keyhole. The other flower in the set uses arrows. It make is incredibly easy to make a beautiful image.
For my background, I used the same method as my first card, but stepped it up by adding another layer of stripes. The method is the same for the first four steps. See below for the additional steps.

To complete my card, I trimmed the trellis panel to 4×5-1/4″ and layered it onto a standard A2 top folding card base. I trimmed another white panel to 3-3/4 x 5″ and assembled my flower on that. I chose a sentiment, and added some pink pearls from Studio Katia. I thought the pink sentiment really worked with this card.
Make a Wish Birthday Card
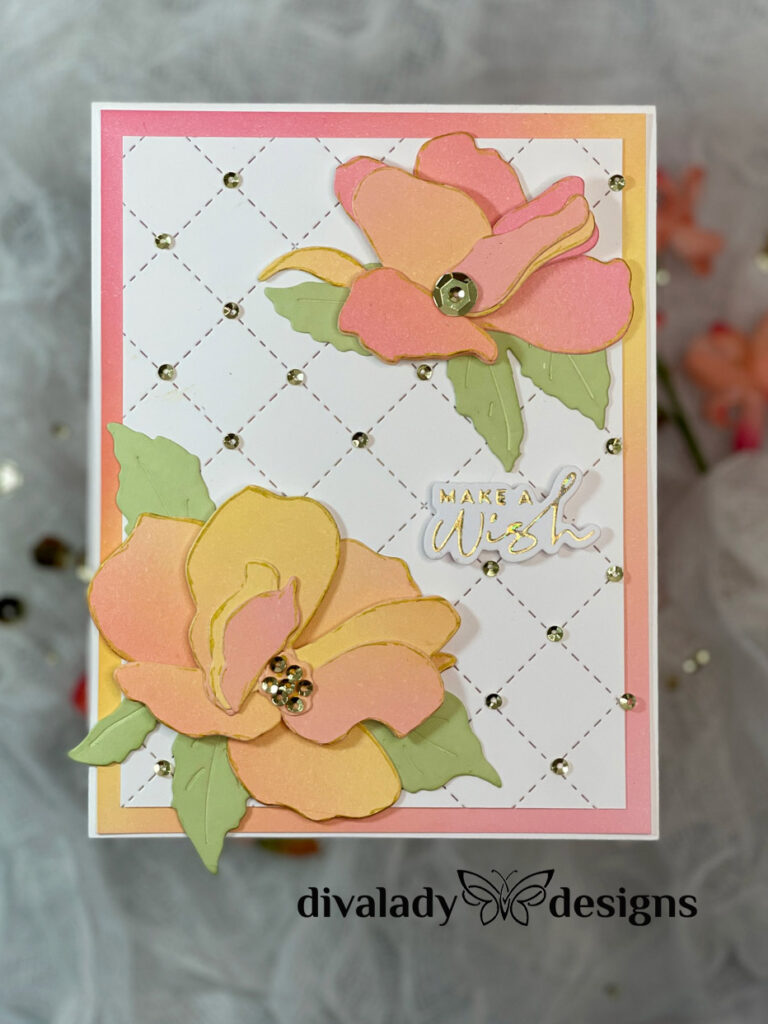
For this next card, I also used the Altenew Craft-A-Flower: Garden Rose layering die set, but I used ink blending for the petals. Let’s take a look at how that differs from the direct to paper method.
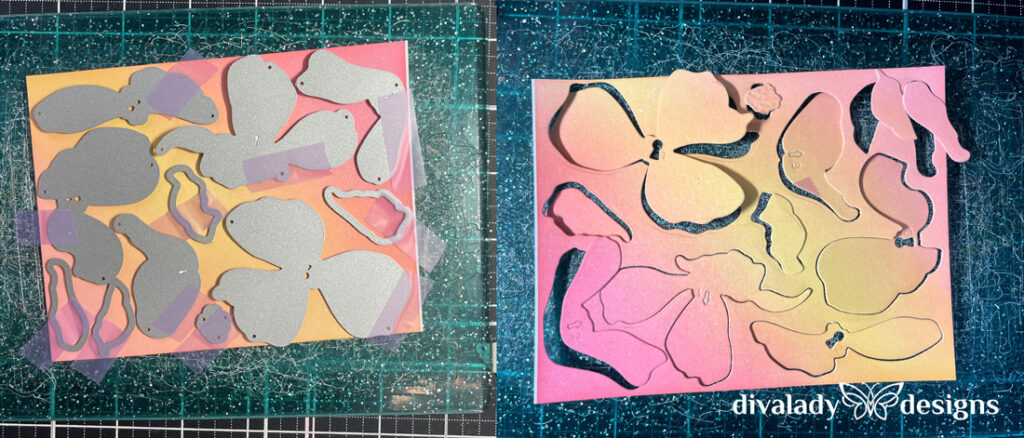
I started with an ink blended panel like the one I created earlier. Then, I placed the dies for the flowers onto the panel, taped them in place and die cut them. This gave a more gradient tone to the petals.
To create my background, I die cut a piece of 3-3/4×5″ white cardstock with Concord & 9th Quilted Card Front Die. This gave me the trellis feel to the background and made it consistent with my other cards. Then I assembled the flowers. As I was assembling, I felt the flowers needed something more, so I outlined each petal with a gold gel pen from Altenew. Then, I layered the whole panel onto another ink blended panel. I added some Altenew Sequins – Antique Gold at each cross section on the die, then placed a foiled sentiment.
Easy Birthday Card
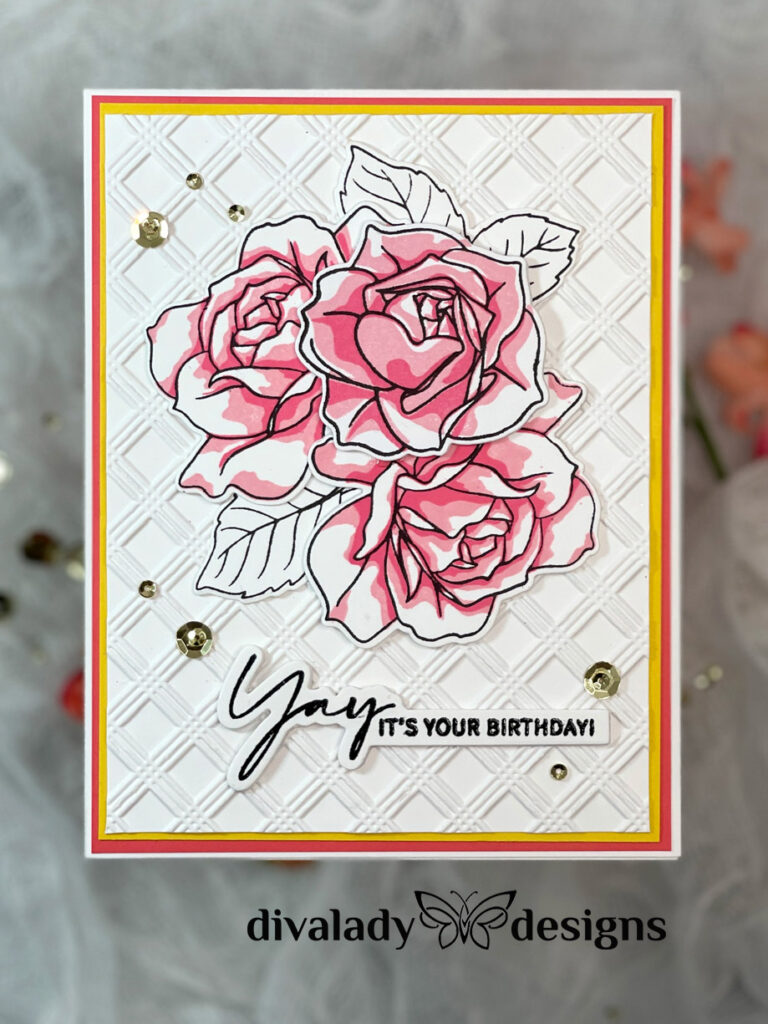
For my final card, I went with layered stamping. I stamped and layered a ton of roses from the Altenew Craft Your Life Project Kit: Garden Rose, using Altenew Crisp Dye Ink – Coral Berry, Altenew Crisp Dye Ink – Cotton Candy and Altenew Crisp Dye Ink – Permanent Black. Then, I die cut the roses. I also die cut three additional roses for each flower from white cardstock which I stacked together to create dimension. I also stamped and cut quite a few leaves from the same set using the Permanent Black ink.
For my background, I used the Altenew Basic Plaid 3D Embossing Folder. I saw Jennifer McGuire use this folder in a video once, and I just HAD to have it!! I embossed a piece of white cardstock, then trimmed it to 3-3/4x 5″. I also cut a pink panel (4-1/8×5-3/8″), and a yellow panel (4×5-1/4″). I layered all three on top of a white, A2 top-folding card base.
Then I arranged my roses and leaves in the middle of the card. A sentiment and some Altenew Sequins – Antique finished the card.
But Wait – There’s More!!
My final step in creating this set was the holder. For this, I created an envelope from 12×12 cardstock using a technique I learned from Lana Taber at an Altenew Craft Your Life Retreat. I LOVE THESE RETREATS! If you ever have a chance to sign up, do so! The techniques and skills you will learn are invaluable.
The envelope is easy to create. It will end up being 5×7 in size, perfect for holding five cards and envelopes.
- Choose a 12×12 piece of scrapbook cardstock. 65-80 lbs is best – it will be firm enough to hold its shape without being too difficult to fold.
- Trim the cardstock to 10×10.
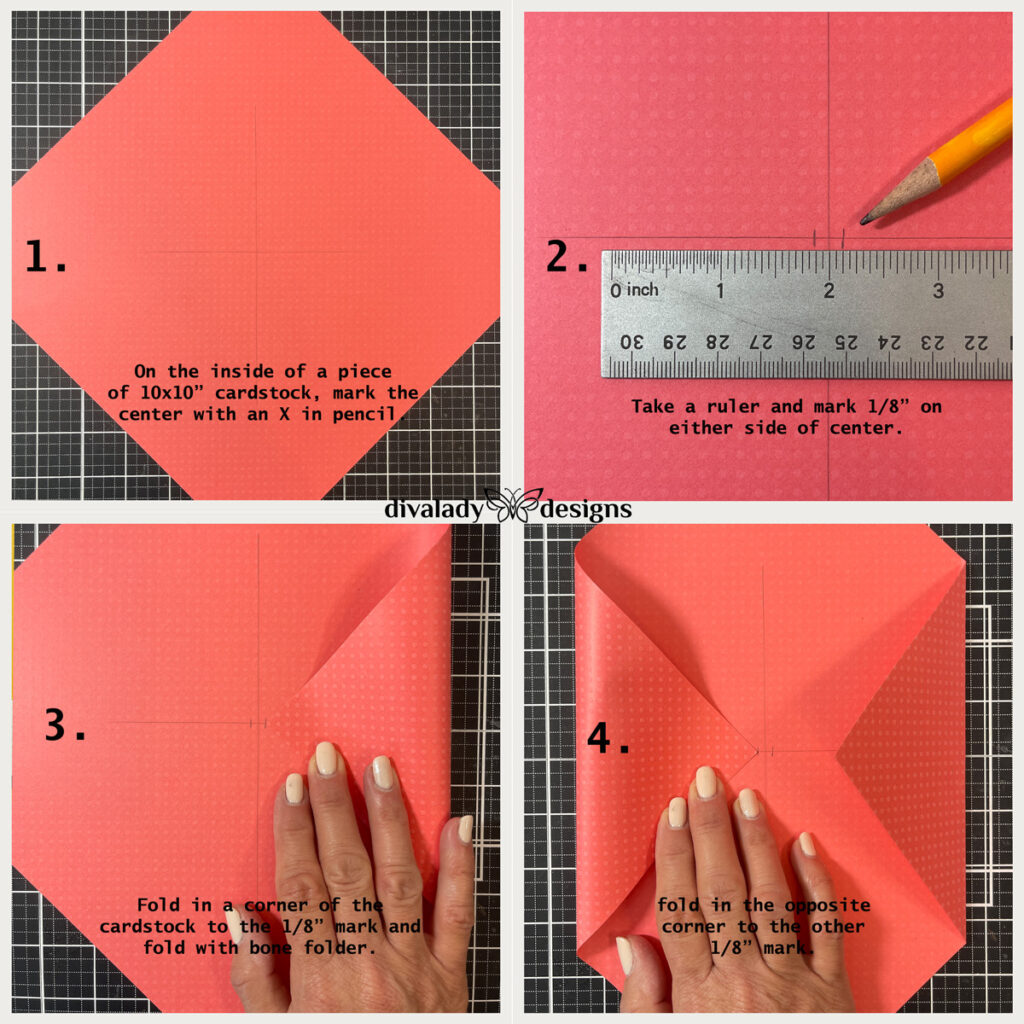
- On the inside of the cardstock mark the center with an X in pencil going from corner to corner. The cards will cover this mark when the envelope is complete, but you can erase it after folding if you wish.
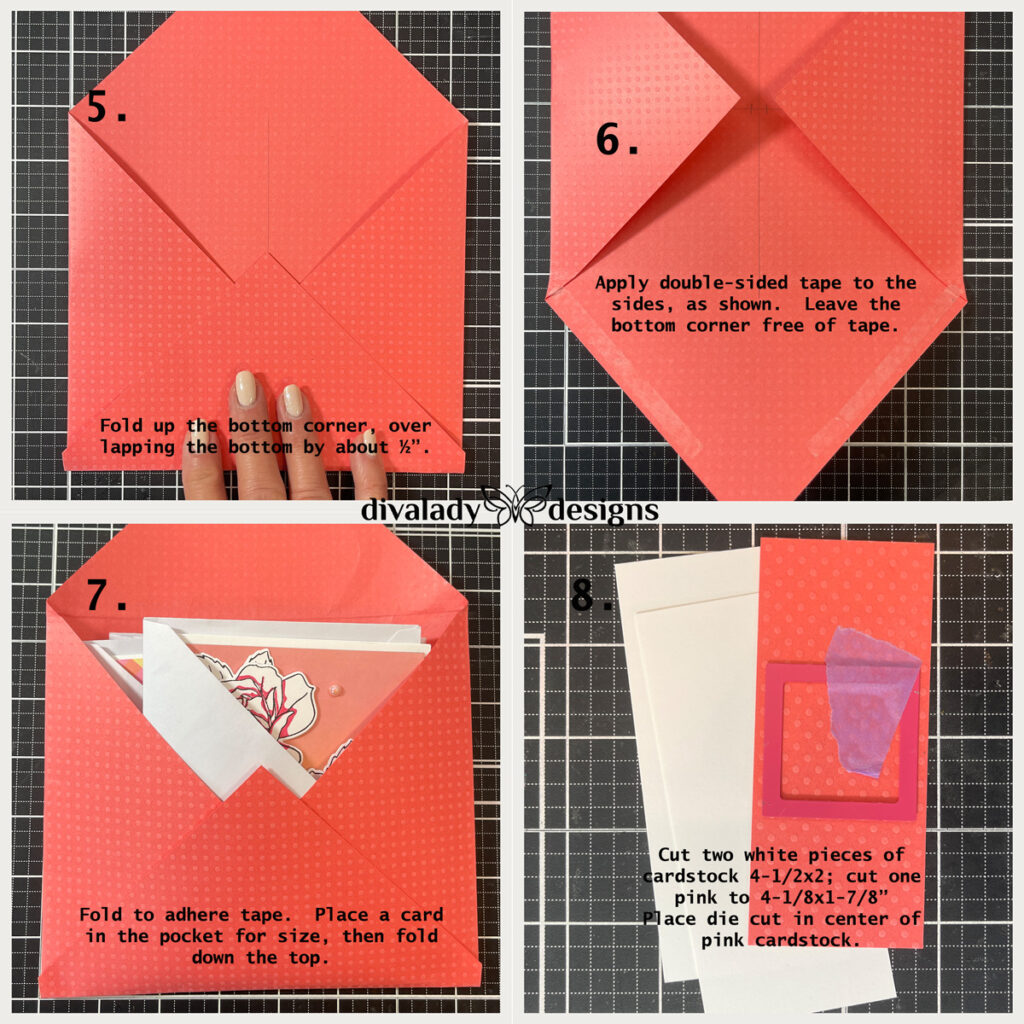
- Take a ruler and mark 1/8” on either side of center. Fold in a corner of the cardstock to the 1/8” mark; fold in the opposite corner to the other 1/8” mark. Fold up the bottom corner, over lapping the bottom by about ½”. Fold down the top corner to match.
That’s the envelope! I’ve shown what I did to create and decorate in more detail below.
And there you have it. This special card set will go to my sister, my best friend. I hope this has inspired you to create your own card set. Happy crafting!

 Card Set Creation – For Him
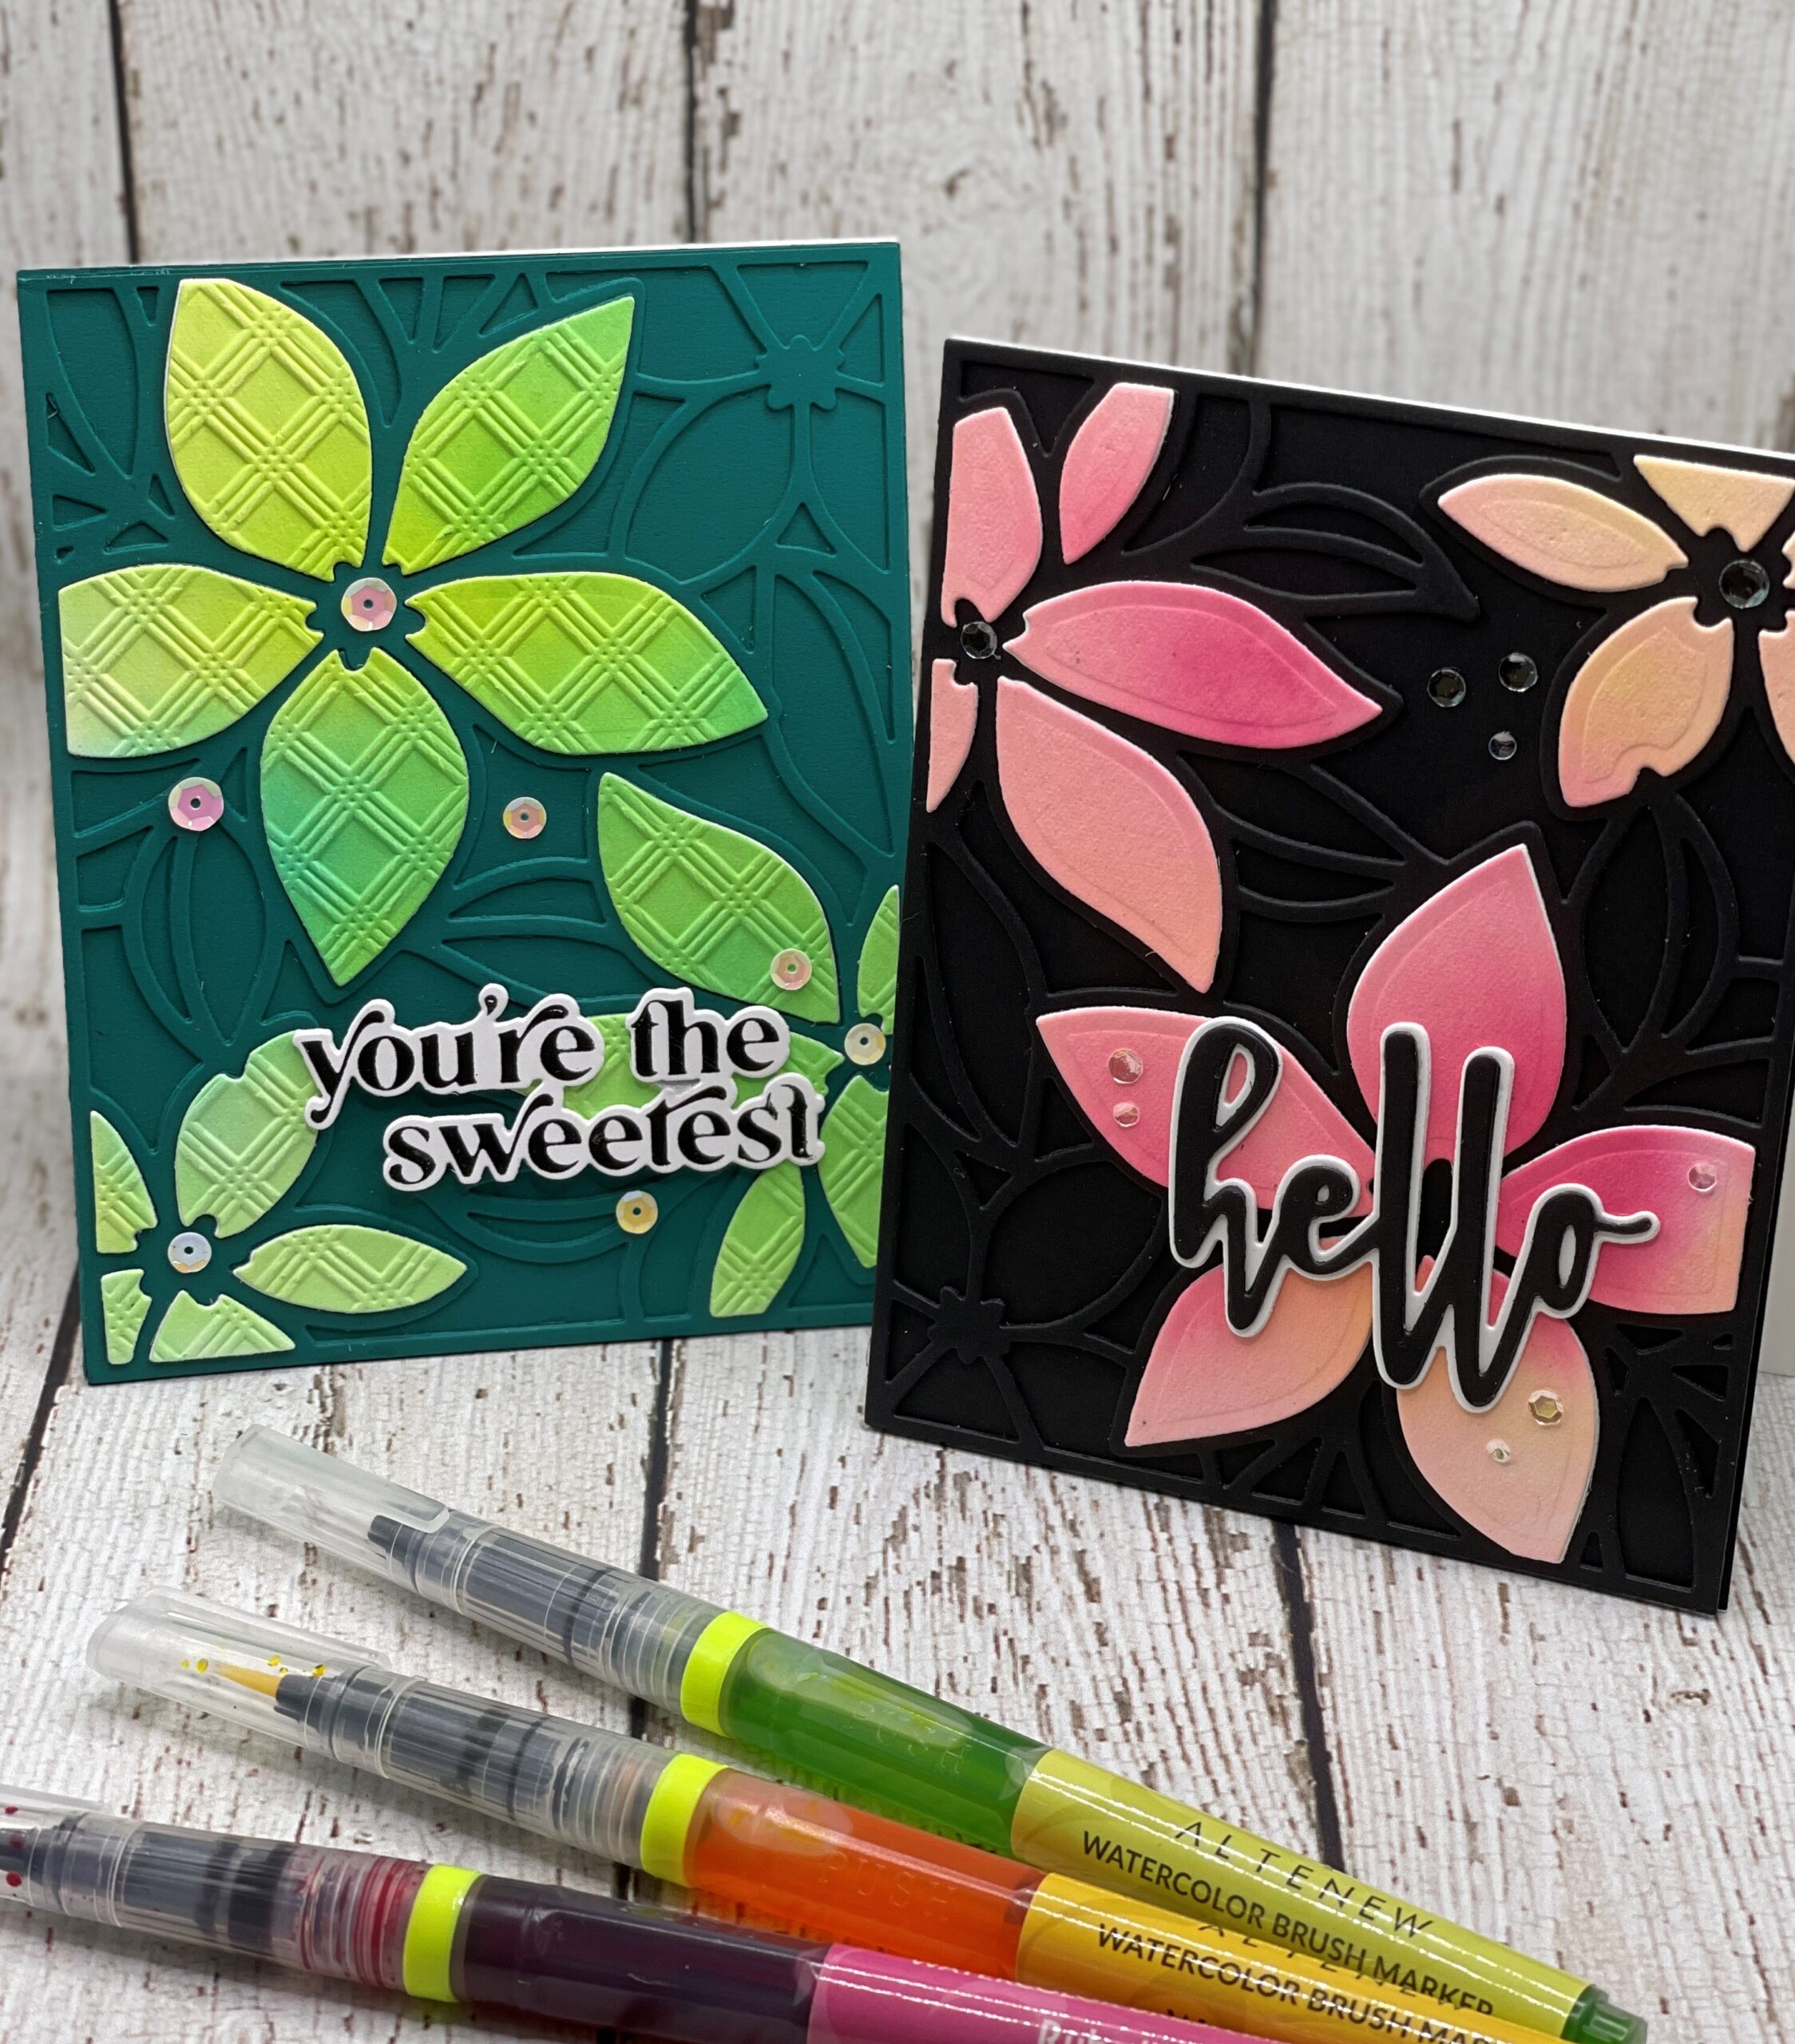 Easy Die Cutting Techniques
 Whimsical Easel Card
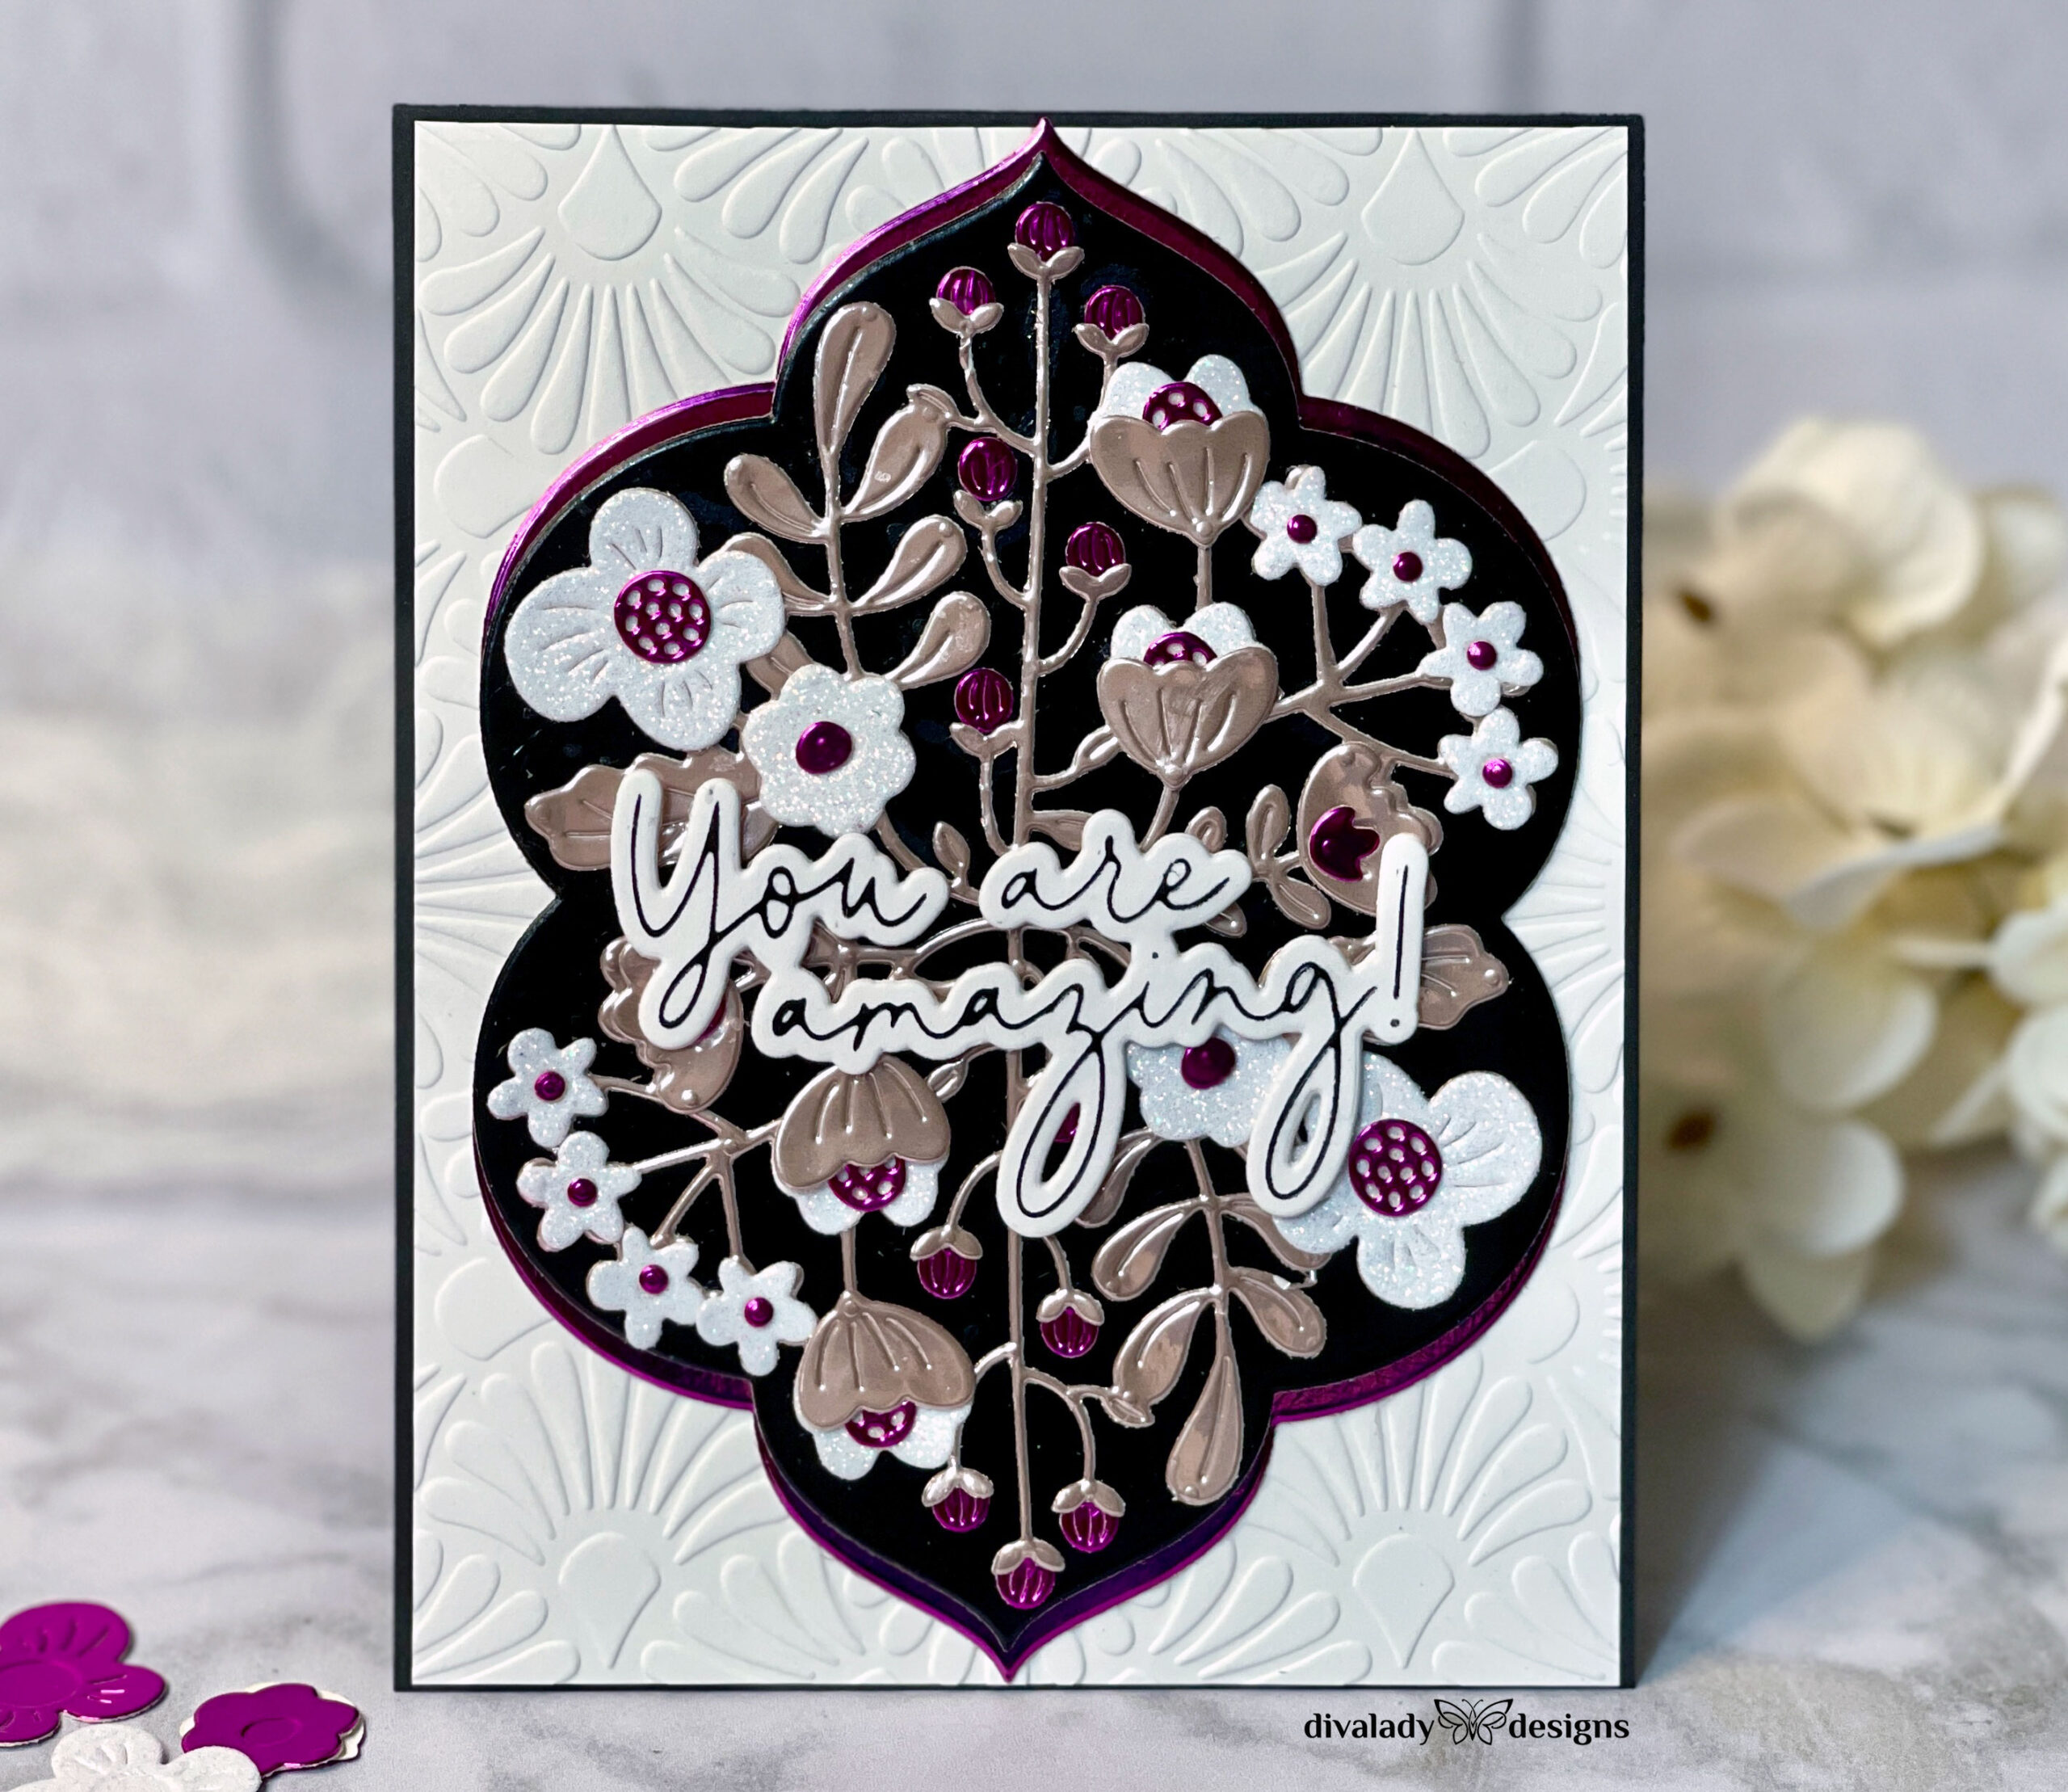 My Favorite Color Rule
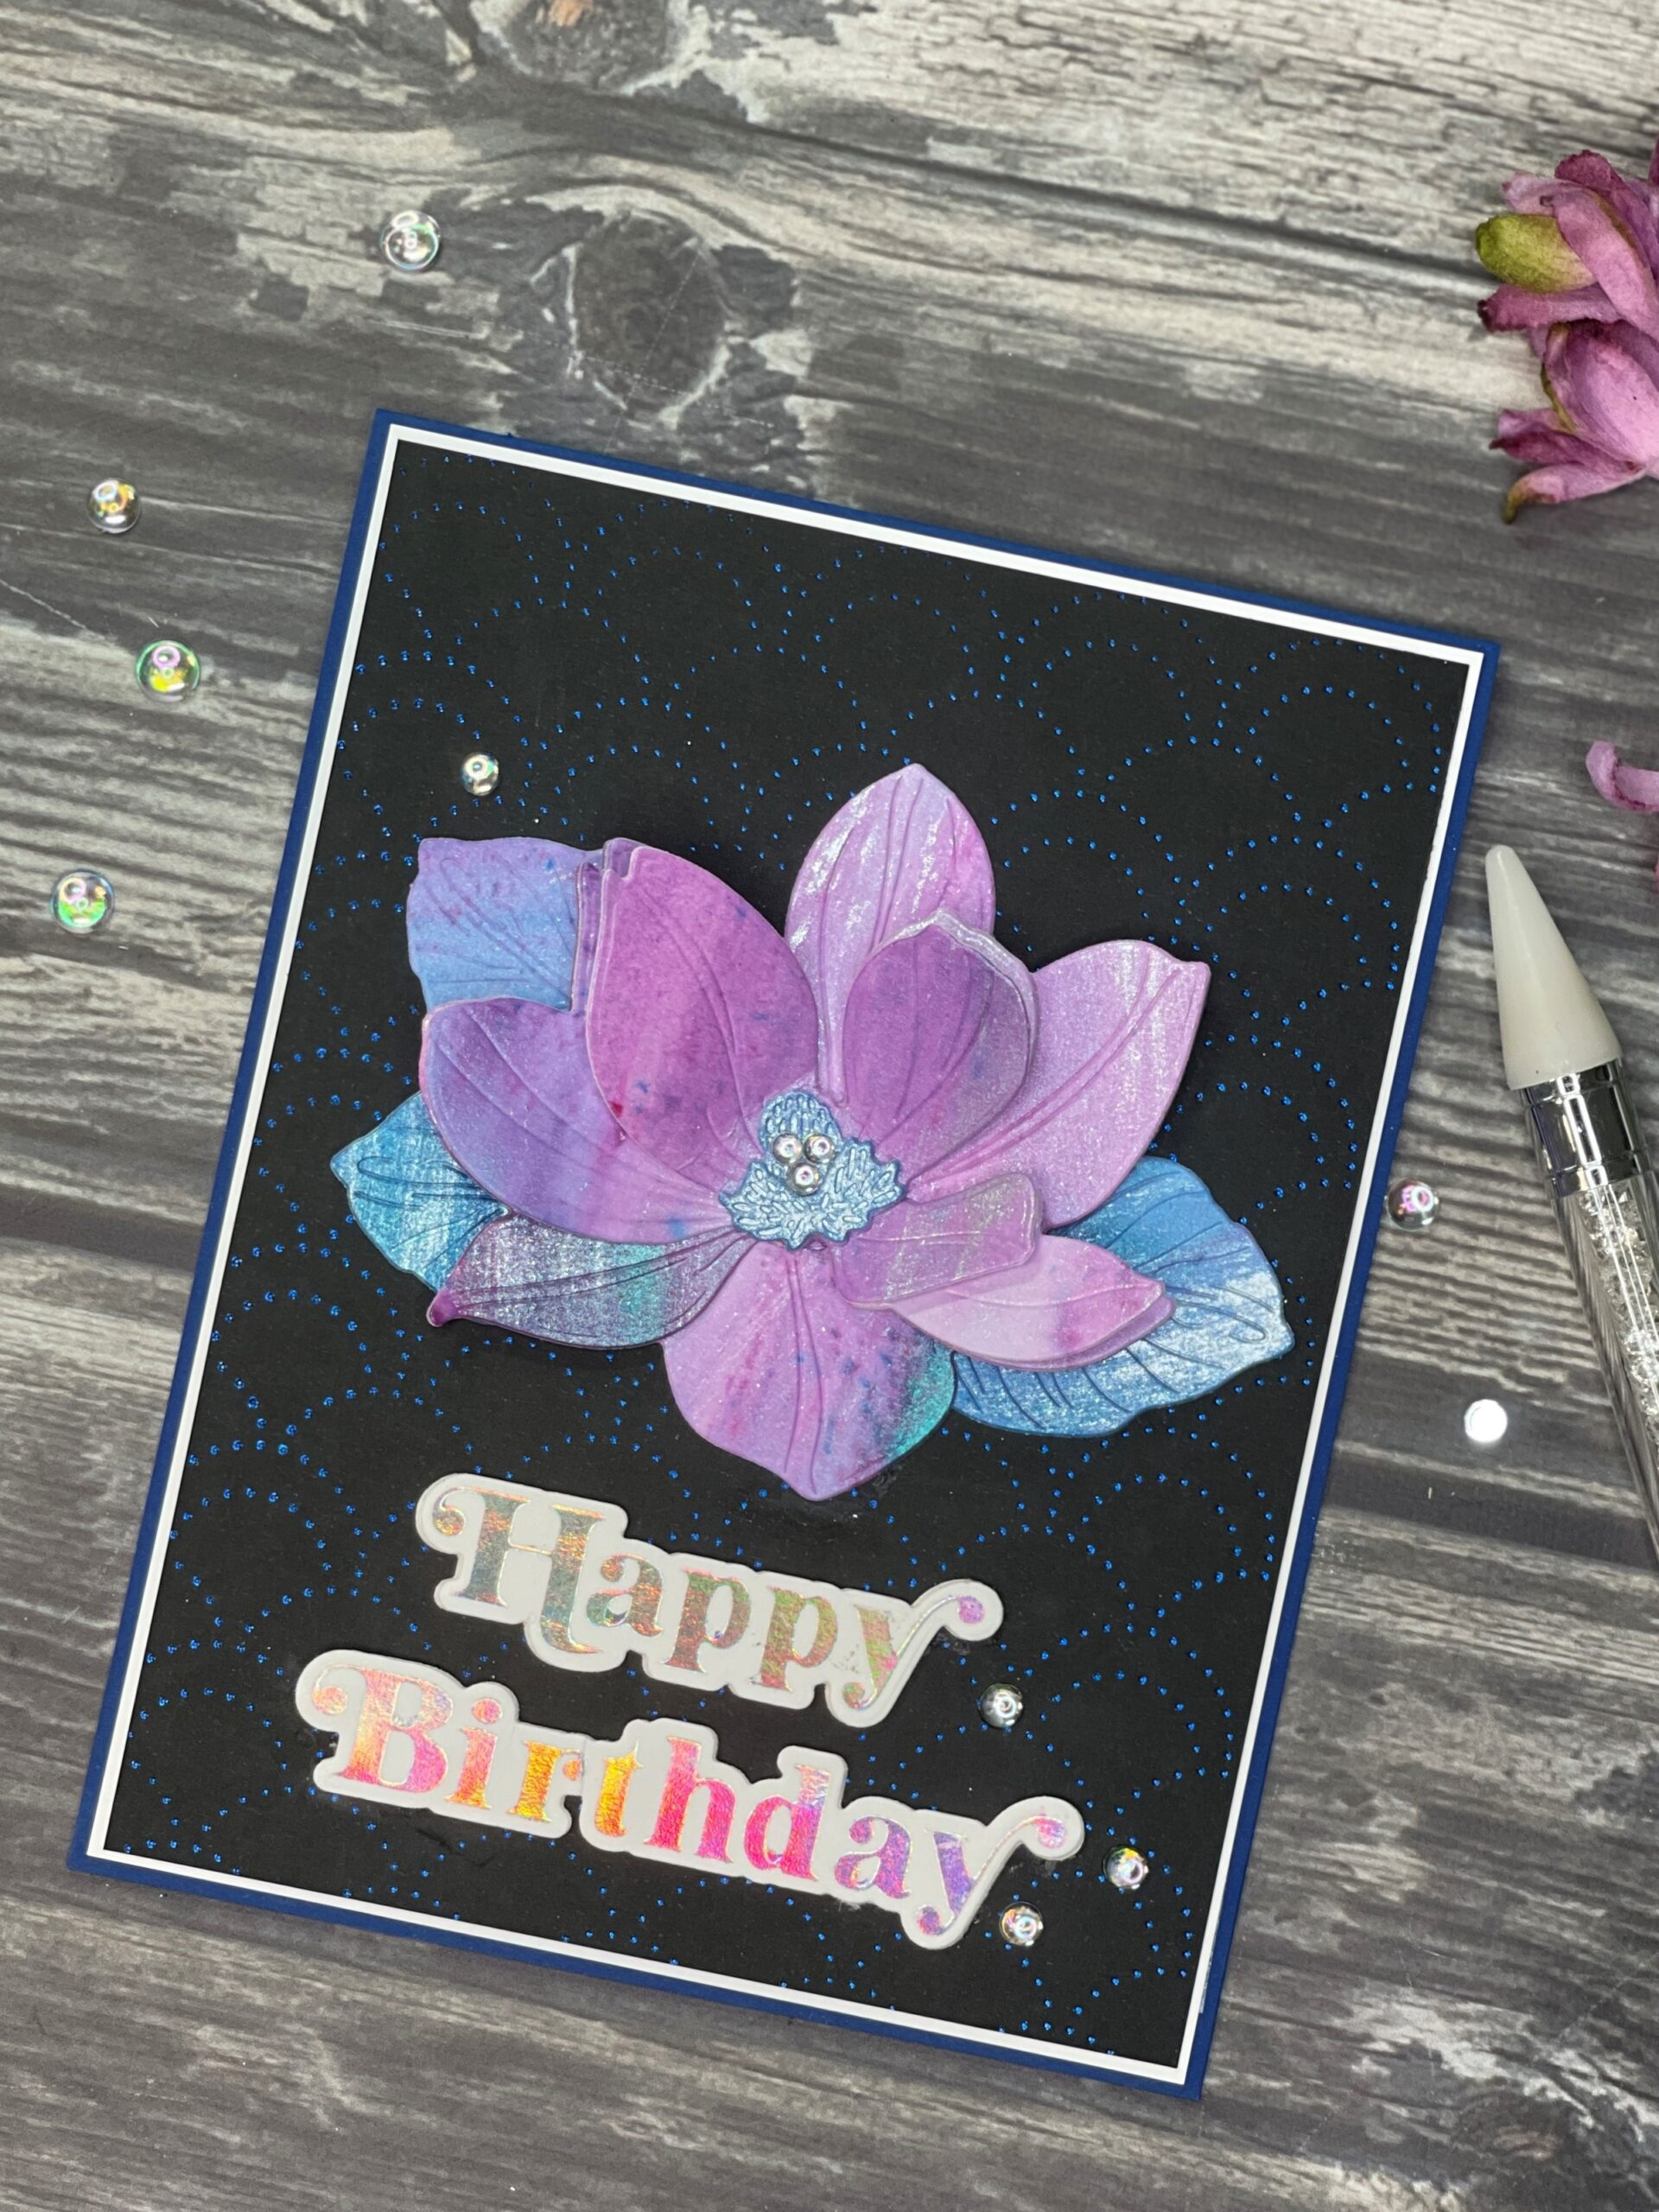


Wow!!! These are really amazing. The detail is great. I would love to receive these cards as a gift. Can’t wait to see what you do for the guys.
Thanks, Leann – pm me your address and it’s yours!
These are absolutely brilliant!! Each card is a work of art. I love that you have kept each card with a unique design and layout. Bravo!!