Welcome to my blog! I’m so glad you’ve decided to take a few minutes to check me out.
Creating a masculine card can be challenging. Flowers are out. Pastels are a no-no. And cutsey can be dangerous. So today I thought I’d focus on some ideas and tips for creating a masculine card set. I hope these ideas inspire you to experiment with your own masculine cards.
This is also part of the Level 1 Final Project in the Altenew Educator Certification Program. My assignment is to create two sets of cards, one masculine, the other feminine, using at least three techniques learned from the Level 1 courses. The sets must be cohesive, have a card holder and include one recycled item. This post is dedicated to the Card Set for Him. I have another post for the Card Set for Her – feel free to check it out!
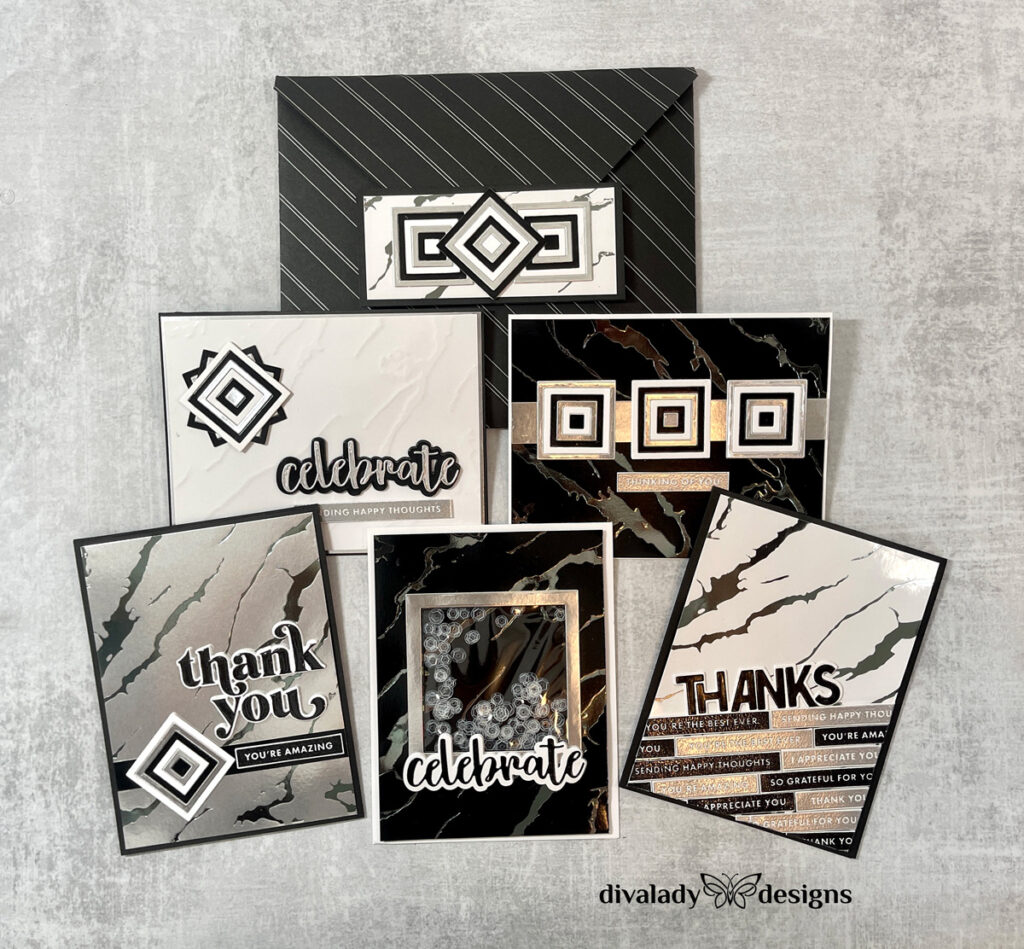
This set took planning. First, I made a list of things that I thought of as masculine: black, grey, rocks, metallic, geometrics, silver, simple, uncluttered. Once this list was in front of me, things began to come together! I immediately thought of the Altenew Exquisite Marble Hot Foil Plate. I had purchased it a month or so ago and had yet to use it, but marble felt very masculine to me and it would make some fabulous backgrounds.
My color scheme was easy: black, grey, white and silver. All elegant and neutral choices. Then, I began to explore techniques from the courses I had taken and the rest fell in place. First, For the Guys, the perfect place for ideas. Then, Easy Die-Cutting Techniques – I could use Spellbinders Color Block Mini Squares Dies to create some geometric focal points. And finally, Let it Shine. I would use foiling, silver embossing and glossy cardstock to give the cards an elegant, yet masculine, feel.
Foiling – Game Changer
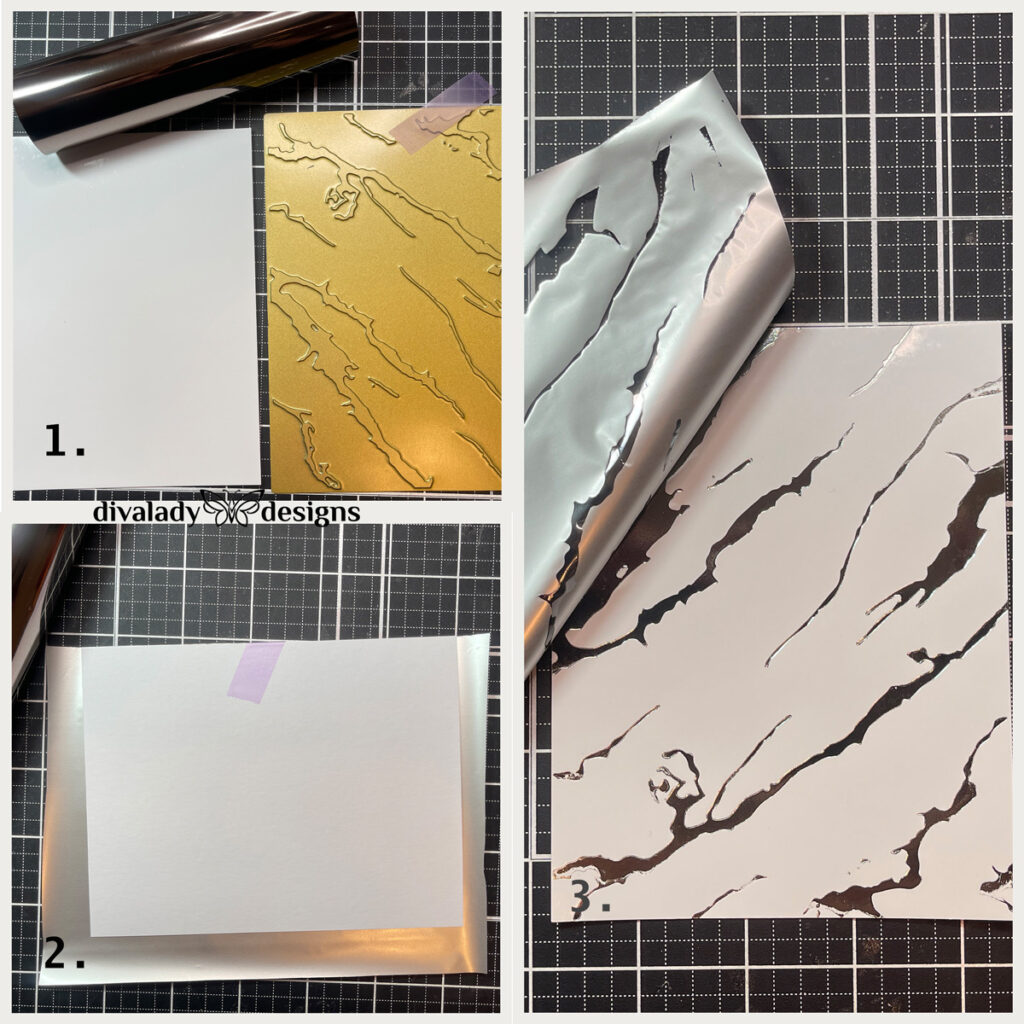
The day I discovered foiling, my crafting life changed. I love the effect that this technique gives a card, especially backgrounds and sentiments! There are a few foiling systems out there, but I use Spellbinders Glimmer Hot Foil System. It’s relatively easy to use and the results are spectacular.
For my cards, I wanted to foil on different colored backgrounds. Foiling on backgrounds other than white can be a challenge – you have to be willing to experiment with cardstocks and foils. I’ll be honest, my first attempts on black cardstock were not great, and I was about to give up when I thought, “I wonder if I can foil on glossy cardstock?” I created five foiled backgrounds using pewter foil on glossy silver, black and white cardstock from Simon Says Stamp. BINGO! Not only was it possible, the results were stunning!
SOME TIPS: * Let your machine heat up well! It’s OK to push the timer button twice, especially when foiling on colored cardstock. * Create a hinge – it makes foiling much easier (see photos below). * Always have the foil side “kiss the plate.” The matte grey side should always be against the cardstock, otherwise, you foil the plate, not the cardstock!!
My First Card
Recently, I had seen a card which had sentiment running diagonally across the front and fell in love with the idea. AND, I and finally received Altenew Bold Sentiments Stamp Set. It’s very popular and hard to get your hands on, so I wanted to use it!
I decided to use the stamp set to emboss lots of sentiment strips in silver and black and run them across the front of the card front. I chose three or four sentiment strips that weren’t too “feminine.” Then, I stamped them in black VersaFine ink on white cardstock and heat embossed with clear embossing powder. For the silver, I stamped in VersaMark ink and heat embossed it in silver embossing powder. I created a LOT of sentiment strips. Make sure to prep your cardstock with an anti-static tool, first! It really helps keep the embossing powder from sticking to the oils from your fingers.
Then, I assembled the strips and placed them on one of my foiled card fronts cut to 4×5-1/4″. I’ve shown my steps below.

I mounted the panel onto a top-folding, black A2 card base, and added my main sentiment.
Die-Cutting For the Win!
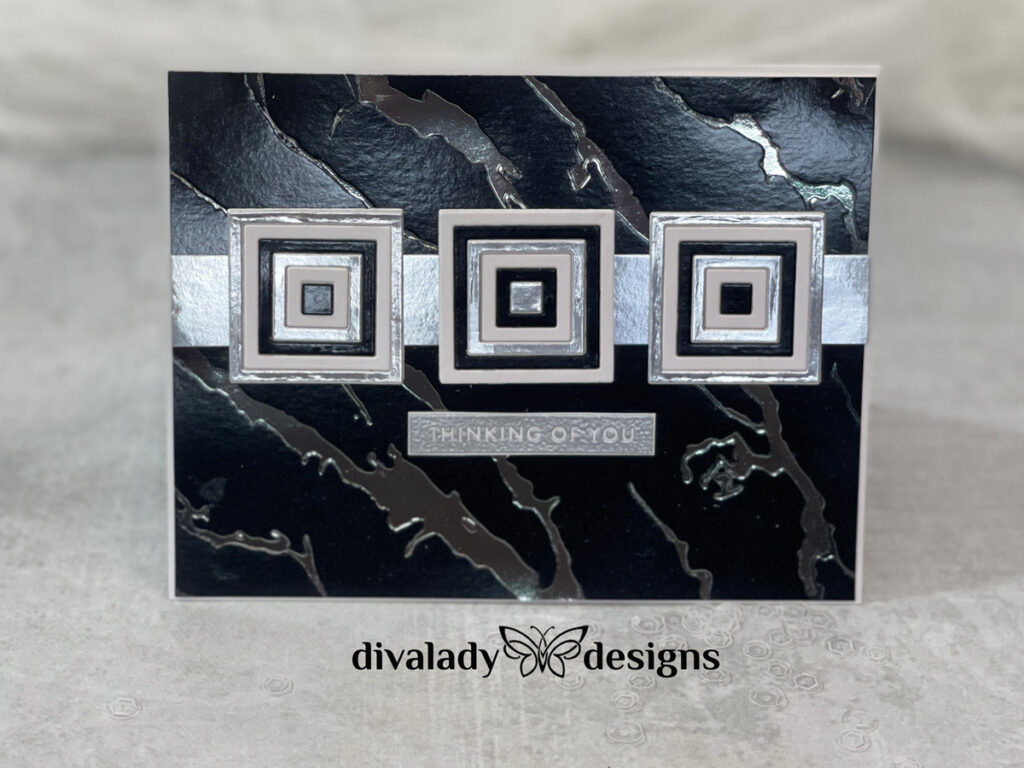
For my next few cards, I turned to die-cutting. I chose to use the same three colors of glossy cardstock to create my geometric focal points.
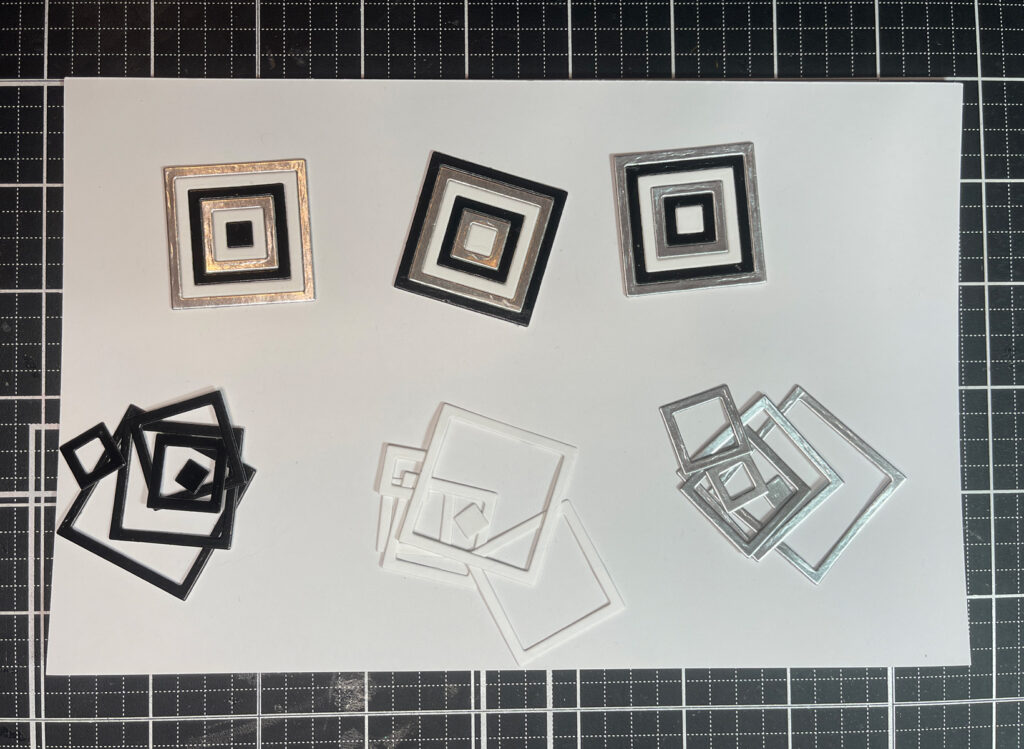
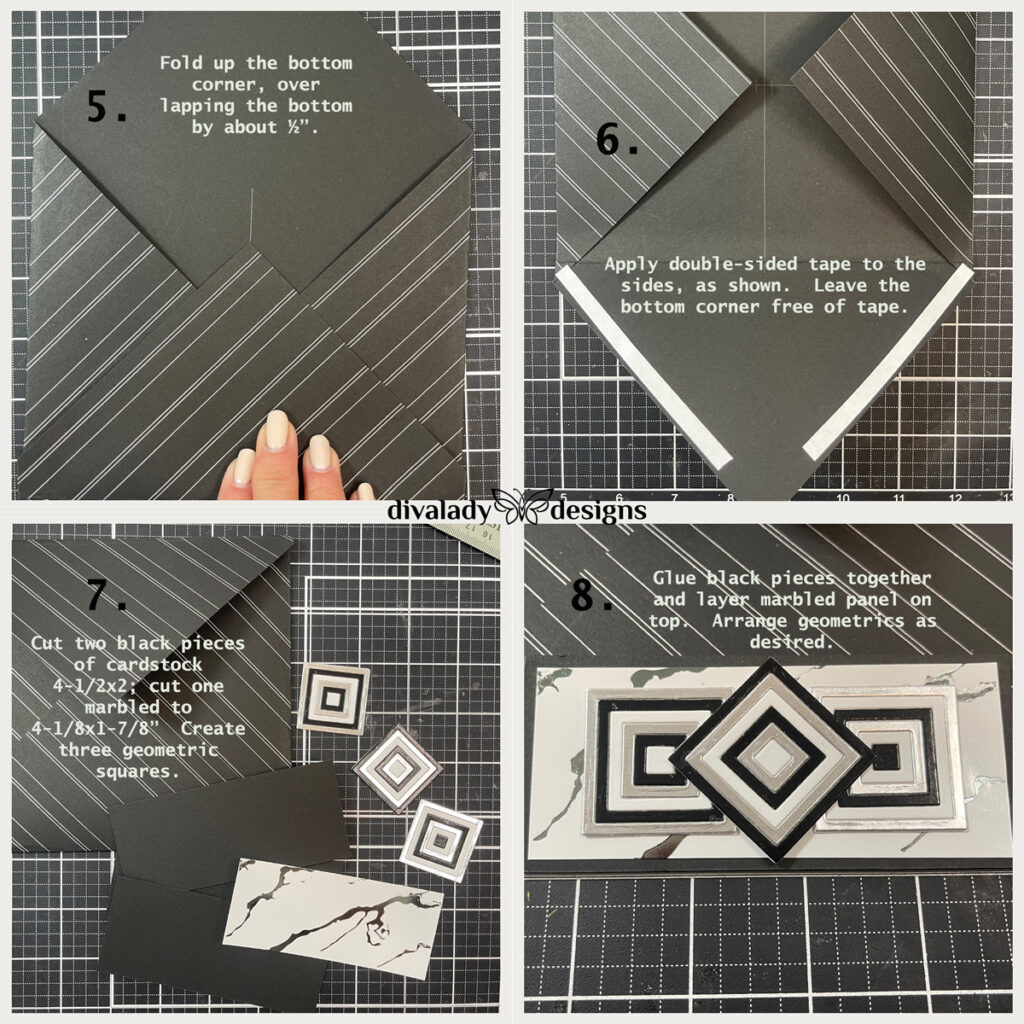
I chose to use Spellbinders Color Block Mini Squares Dies. This set comes with two dies: one cuts a solid square (the base), and the other cuts six little frames in one pass. By cutting from different colors, you can create different looks. I cut the squares from black, white and silver cardstock and created different geometric squares. I made quite a few since I wasn’t sure how many I would use.
I arranged three of my squares on a piece of glossy silver cardstock 3/4×5-1/2″, and mounted it onto another of my foiled backgrounds. I used one of my embossed sentiments below.
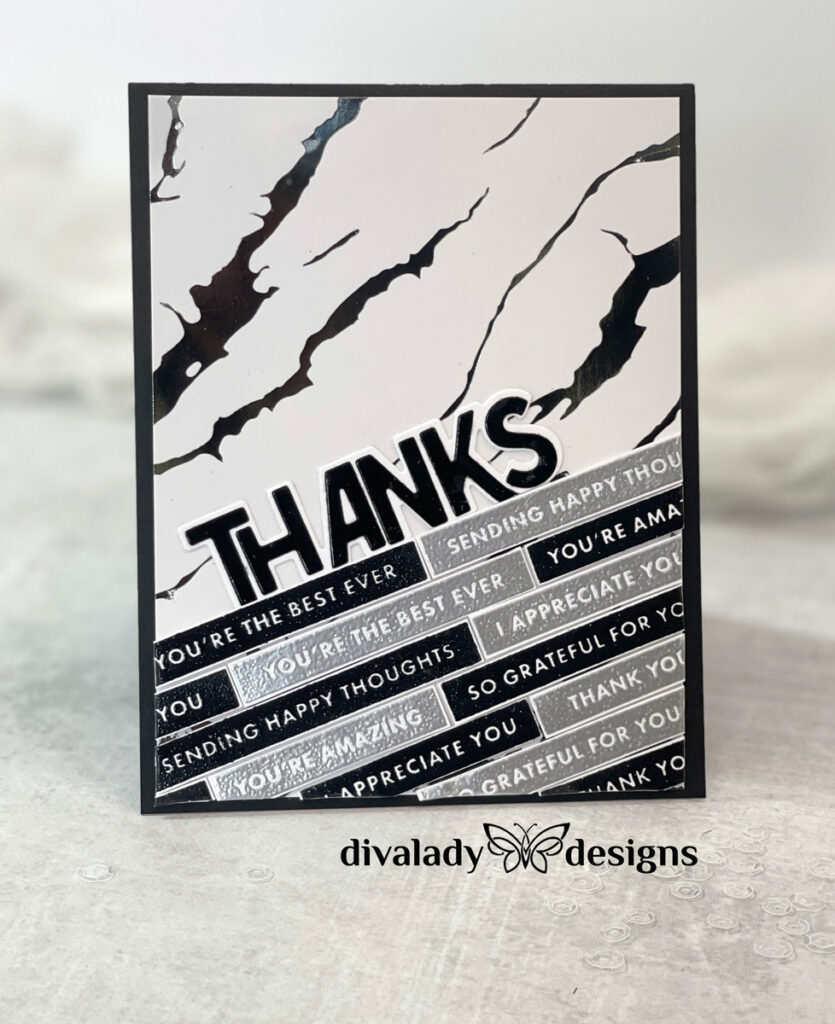
Thank You Card 2

By this time, I had all the elements I needed to create another card. For this one, I kept it simple, mounting one of my geometrics onto a strip of glossy black cardstock 4×5-1/4″. I added another embossed sentiment strip, gluing it onto a small strip of white cardstock so that it would stand out against the black.
Now, I’ve mentioned this in previous posts, but I have a sentiment stash.
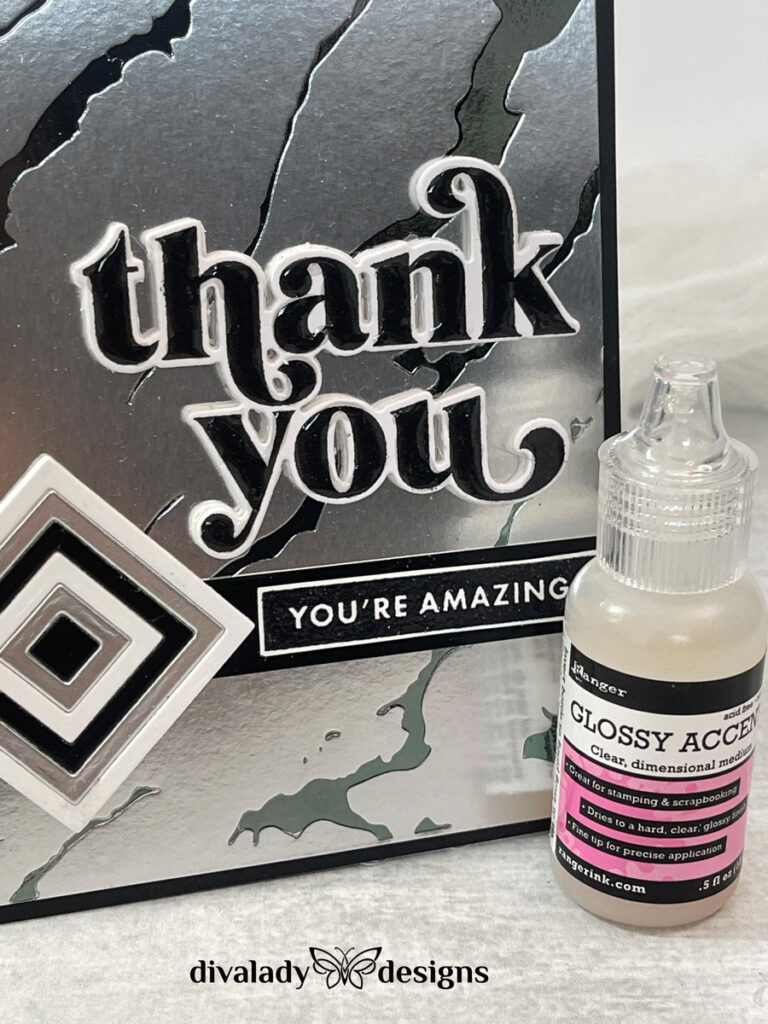
I’m partial to die-cut sentiments. they are easy to create, and can be placed anywhere on a card. When I find a sentiment I like, I make lots of them and put them into little containers. That way, they are always on hand for my cards. So choosing a sentiment for this card wasn’t difficult. But I wanted a little more shine, so I added some Glossy Accents to it.
They Say It’s Your Birthday
My life partner is always telling me that guys need birthday cards, so the last two cards are just that.
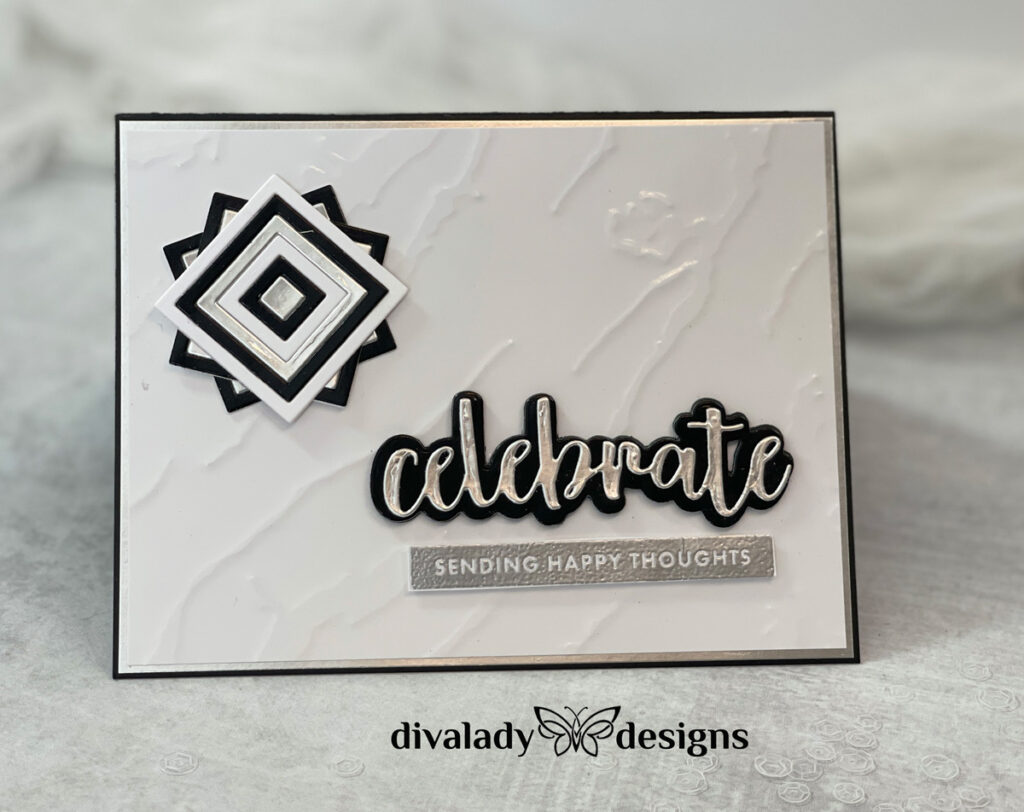
For this background, I did something different. I used the foil plate to dry emboss a piece of glossy cardstock. YES, you can use foil plates and dies to dry emboss! Each machine has a set of plates that are for dry embossing. Usually, it’s a flat plate and an accompanying rubbery type sheet. Place your cardstock on top of the foil plate or die, then place the rubbery sheet on top of that. When you run it through your die cut machine, it will dry emboss the cardstock instead of cutting it.

I really loved the result! I used my geometrics squares and embossed sentiment strips, mounted the panel onto a piece of glossy silver cardstock, and then mounted the whole thing on a black, side-folding A2 card base. For the main sentiment, I found this Celebrate in my stash – perfect!
Shake Shake Shake!
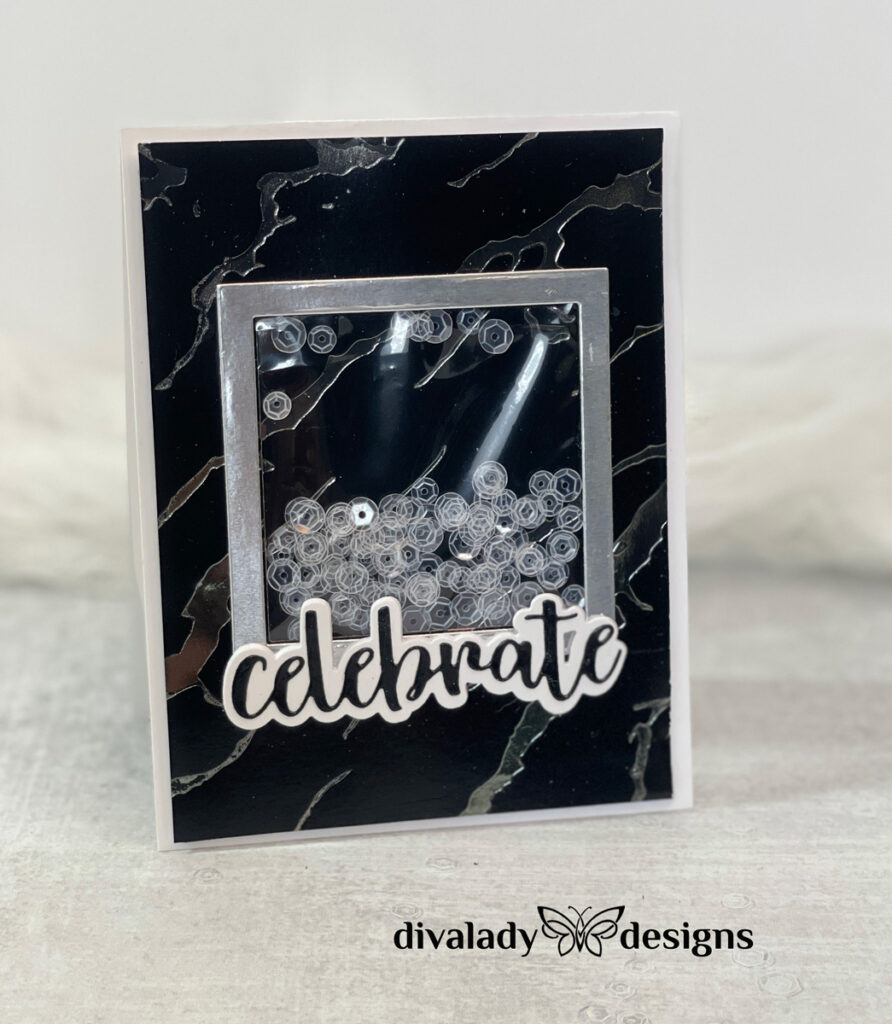
This last card uses the recycled item I chose – leftover acetate packaging. To create my shaker card, I used a slightly different technique which I learned from Jennifer McGuire. I wanted the back of the shaker area to be the same pattern as the rest of the background. In order to accomplish this, I used layers of cardstock to create the walls of the shaker. Instructions are in the video below. If you would like to see a pictorial instruction, check out the shaker card in my Card Set For Her post.
The Envelope Holder
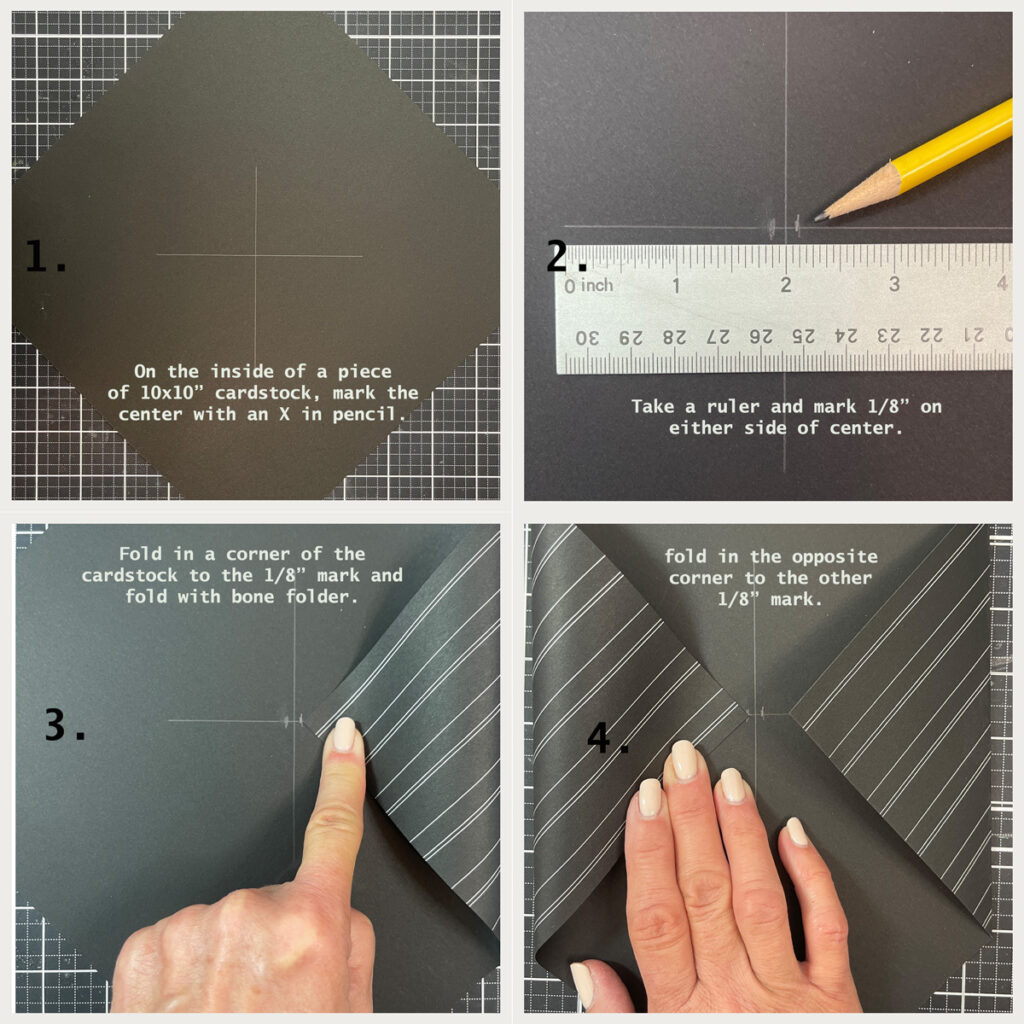
My final step in creating this set was the holder. For this, I created an envelope from 12×12 cardstock using a technique I learned from Lana Taber at an Altenew Craft Your Life Retreat. I LOVE THESE RETREATS! If you ever have a chance to sign up, do so! The techniques and skills you will learn are invaluable.
The envelope is easy to create. It will end up being 5×7 in size, perfect for holding five cards and envelopes.
- Choose a 12×12 piece of scrapbook cardstock. 65-80 lbs is best – it will be firm enough to hold its shape without being too difficult to fold.
- Trim the cardstock to 10×10.
- On the inside of the cardstock mark the center with an X in pencil going from corner to corner. The cards will cover this mark when the envelope is complete, but you can erase it after folding if you wish.
- Take a ruler and mark 1/8” on either side of center. Fold in a corner of the cardstock to the 1/8” mark; fold in the opposite corner to the other 1/8” mark. Fold up the bottom corner, over lapping the bottom by about ½”. Fold down the top corner to match.
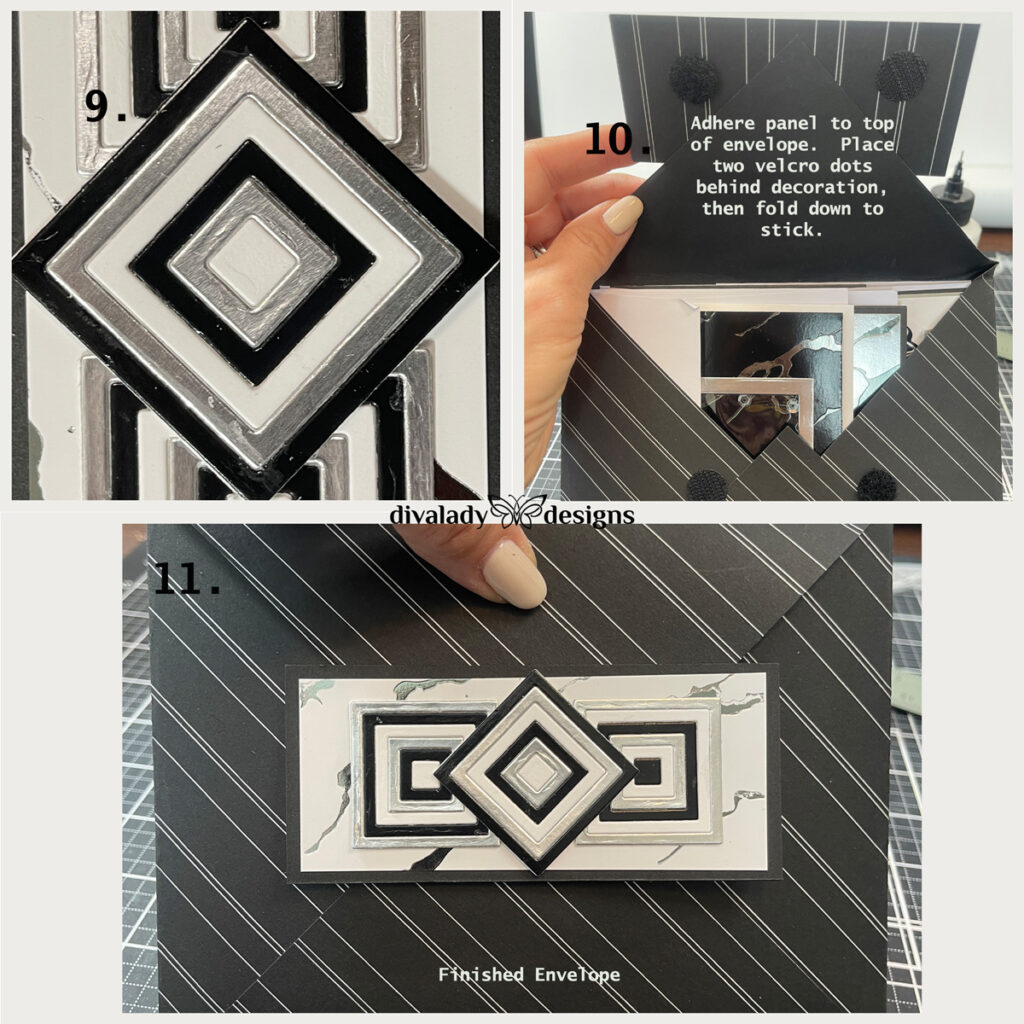
That’s the envelope! I’ve shown what I did to create and decorate in more detail below.
And there you have it! A wonderful masculine card set. I gave this to my partner, and he was thrilled with it. He especially loved the geometrics and black color scheme.
Thanks so much for reading today. Happy crafting!!

 Super Easy Heat Embossing Technique
 One Background Technique – Three Gorgeous Cards!
 Dancing with Spellbinders
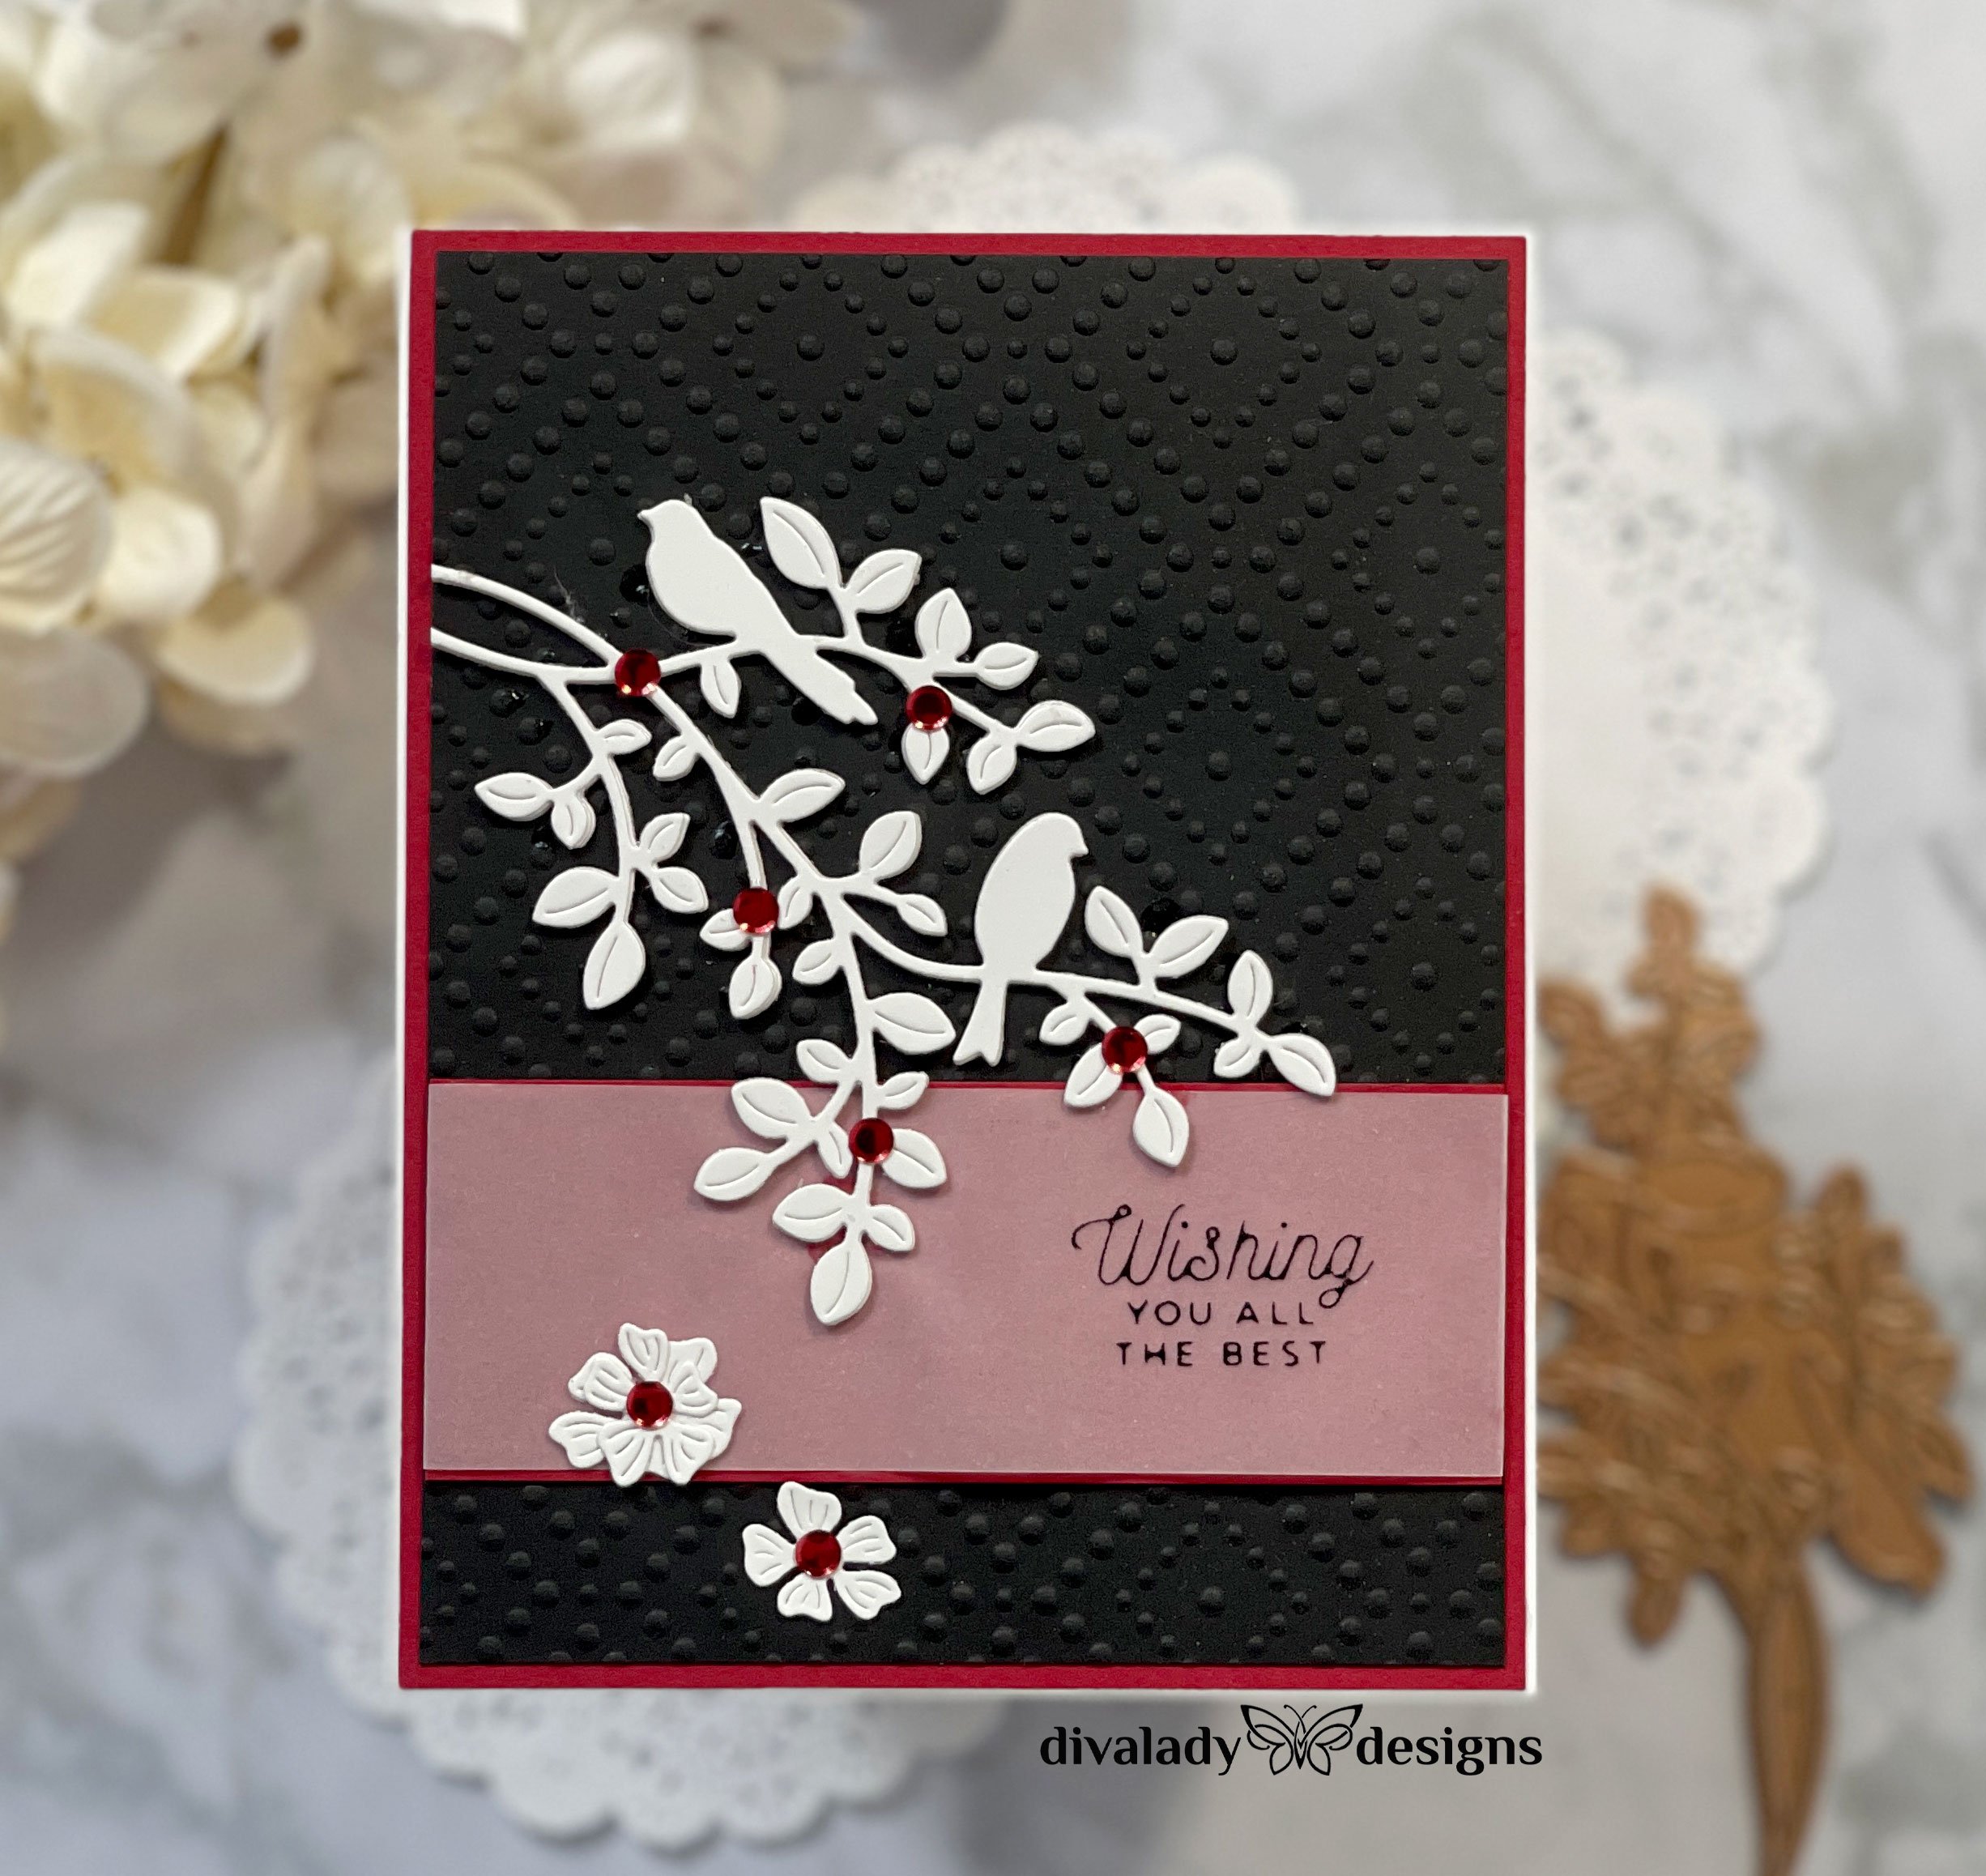 Dies, Dies, Dies!


Fab set of cards! LOVE how you’ve done the foiling, that’s perfect for ‘man’ cards, as I call them. They are a challenge to make for sure! You did a great job!
This is exquisite!! Look at the gorgeous, elegant card set! These are SO classy and beautiful! You have done a wonderful job! Thank you for sharing your beautiful work with us and linking it to the AECP assignment gallery. Top job!
Great job! Love the colour palette and elegant feel.
Your cards are gorgeous. Love the colour palette and the foiling aspect is so elegant. You’ve knocked the challenge off the park!
Thank you, everyone, for your very kind words!
My goodness, your card gift set is amazing, phenomenal. I mean I love how you had a unifying theme/color/texture. Truly awesome set of cards!!